
Beginner's Guide
Beginner’s Guide For WordPress – How to set up a WordPress Website
If you’ve got an idea for a website you want to build and not feeling too savvy or don’t have enough time for website design, no need to take a course as WordPress maybe the answer you’ve been looking for. WordPress is an easy to use program that can make it possible to easily and quickly set up a site and maintain it so that we can see your creative flare shine. To help you out with getting start, we’ve arranged a helpful guide from registering the account all the way to finishing the WordPress installation so that you can easily get to the enjoyable process of bringing your website to life.
Step 1

Go to the Doteasy Main Page and give “Sign Up” a click.
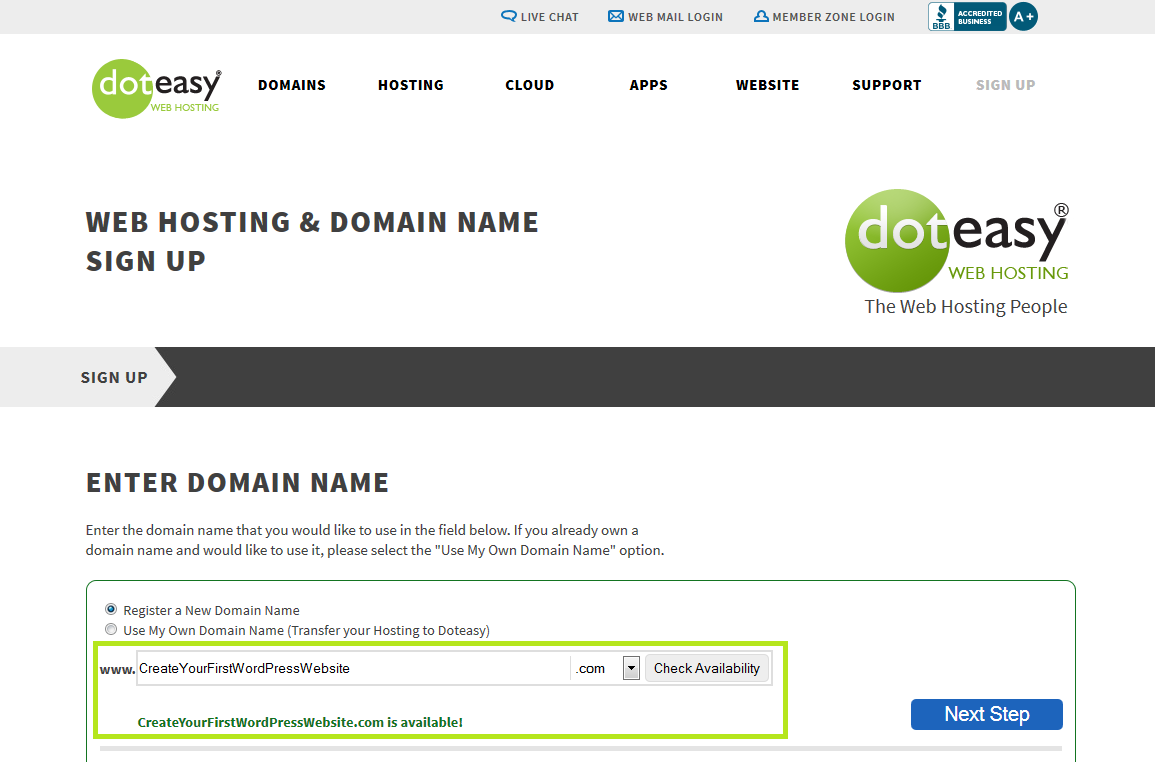
In order to create a website, you’ll need a domain name (www.website.com) to start with.
If you don’t have a domain yet, you can easily enter your desired domain name in the text box and click the “Check Availability” to see what extensions (.com, .net, .org, etc.) are available. When you find your desired domain is available for registration, you can proceed by clicking the “Next Step” button.
If you already own a domain with another domain registrar, you can simply choose the “Use My Own Domain Name” option to transfer the domain to us.

WordPress requires the languages PHP and MySQL in order to be set up and work correctly. As such, you will want to choose our “Unlimited SSD Hosting” plan when you are on the “Hosting Plan” page. The Unlimited SSD Hosting plan is good for websites of any size as it will provide resources for your current site, but for future updates as well as your site grows and becomes more popular. The Unlimited SSD Hosting plan utilizes web servers that are fitted with SSDs rather than conventional hard disk drives (HDD) and is optimized for database-driven websites such as WordPress and eCommerce websites. SSDs provide much higher input/output (I/O) speeds compared to traditional HDDs. This means that SSDs can read and write data much faster, which greatly boosts the speed at which data is access from your website and databases.
For those of you with more then one domain name, the Unlimited SSD Hosting plan allows you to set up add-on domains that can share the same Unlimited SSD Hosting plan without additional hosting costs. Another great benefit for subscribing to the Unlimited SSD Hosting plan is that you can enjoy the 1st Year Introductory price for only $4.95/mo and the domain name (value $15) is already included in the plan. To enjoy the full benefits of this offer, you will want to sign up for the 1-Year Unlimited SSD Hosting Plan.
There are additional features we offer that you can choose to subscribe to (e.g. Automated Daily Site Backup, Spam & Email Virus Protection, etc.) and you can click the “Learn More” icon for each feature to understand the benefits of these features. If you’re unsure of whether a feature is right for you, don’t hesitate to contact us for more information, or you can always choose to set up the additional feature at a later date.

Scrolling down, you’ll see the sections for “Contact Info”, “Login Info”, and “Payment Info”. Simply fill out the requested information in each section. You’ll want to make sure you keep a record of your login Username and Password you set up here as you’ll need them to install WordPress in a later step. Lastly, make sure to check the “Agreement” section at the bottom and go over to application to make sure that all of the information entered is correct before submitting.

You’ll see a confirmation page once you have submitted your application thanking you for the submission and that it was received. A confirmation email will later be sent to confirm once the account is set up and ready for use.

Once your account is activated, go to the Member Zone to access your account. Login with the Username and Password you created when setting up the account earlier. You’ll be prompted with a “New Billing Options and Discounts” page to confirm you signed in correctly. This page shows more information about our hosting plans and will automatically proceed to the next screen after 30 seconds. You can click the “Continue to sign in” button to proceed to the next page on your own if you prefer.

In the Member Zone area you will find many services and features that can be accessed by your account. You can take a moment to look at additional features you can subscribe to and when ready, can click on the link “Site Admin Panel (cPanel)”.

Once you are in the Doteasy Control Panel (cPanel), you’ll want to scroll down to “Doteasy Softaculous Apps Installer” section. Here you will see many scripts you can easily install on your account including WordPress. You will want to click on WordPress to launch the program.

On the Softaculous App page, you are provided with more information towards the application that you are choosing to install such as demo’s, links to the creator(s) site as well as further information and reviews. You can continue with the WordPress installation by clicking on “install” in Blue near the top.

This will take us to the installation page for WordPress where we need to actually set up the program settings. You can leave Protocol as http:// as seen and choose the domain name you wish to install WordPress to. As mentioned earlier, Doteasy’s Unlimited SSD Hosting Plan offers the unlimited add-on domain option. This means that for those of you who have more than one domain in the account, you will have the option to choose which domain you want to install WordPress to.
Moving on you will see “In Directory” which asks you what directory or folder you wish to install WordPress to. For example, if you want your WordPress site to appear at www.Website.com/blog, you will want to type out ‘blog’ in this field. Leaving this field blank will install WordPress to the main domain or using the previous example, www.Website.com.

For the Database Settings, you can customize the database name and table prefix if you wish, however the installer will help generate a name for these automatically if you are unsure of what to put. “Site Setting” allows you to customize the default information that is shown on your site when it is installed. You can place a site name, and description that will show up after installation is completed, but can be changed anytime later on directly through WordPress itself. The “Enable Multisite” option is not required for most users and we would recommend you to not select this option unless you are comfortable with working with WordPress or websites in general.
We would like to highlight the Admin Account section next as this is an important section of the installation. The admin username is used to login to your WordPress once the setup is complete and we would strongly recommend you to avoid using “admin” as the username as this is commonly targeted by hackers. It is important to choose Strong (upper case, lower case and numbers) username and password combinations to help increase your sites security. Make sure that you keep a copy of the information you have set up including the username and password, or enter your email address into the last field on the form to have it email you. Once you’re ready to continue, click “install” and watch it quickly finish the rest for you.

Once it’s installed, you’ll see this “Congratulations” page. On the “Congratulations” page you’ll see two links. The first is the actual WordPress website link where your site is visible. The second is the Admin Login page that you’ll use to create the site with. You’ll want to click on the second link to visit the Admin Page to get started on making the site come to life.

With your WordPress site installed, you can access the Dashboard (main area of WordPress) by logging in here. You can reach this screen at any time by going to www.Website.com/wp-login.php and then enter the username and password that you created in step 11.

Once logged in, you are now in the Dashboard page and this is where the journey begins to create your website. From here, you can do everything including: creating pages, customize layout by installing/changing themes, enhance functionalities of the website by installing plugins, and much more. Check out our Knowledgeable Base for more resources.
What is WordPress
WordPress is an open source website builder and content management system. The biggest advantage of building a website with WordPress is the flexibility of customizing both the look and functionality of your website. You can choose thousands of free, professional, fully customizable themes to jumpstart your website. Vast selection of plugins are available to enhance the functionality of your website. Coding experience is not required to build a WP website. With the WYSIWYG (What-You-See-Is-What-You-Get) dashboard and editor, you can publish your content, images, video, etc. on your website just like how you do it on Microsoft Word Processor. Fortune 500 companies, international firms, celebrities such as CNN, Forbes, NFL blog acquire WordPress websites.
What is a WordPress Plugin
With different plugins, WordPress owners can easily customize their website for different functions. From Google Translator, local weather report, ads manager, social media share button, to PayPal Checkout button, you can install numerous plugins to cater your needs in just a few clicks within your dashboard.
Choosing a WordPress Theme
You can either choose your WordPress theme within the dashboard or download themes from professional WordPress themes providers such as Themeforest and Template Monster. There are many free WordPress themes as well as premium design themes with a small amount of one-time fee. But, the choice is all yours! For more info, please check out here as we’ve hand picked a few wp theme providers for you to choose, both free and paid providers.
What is a WordPress Theme
WordPress theme is the “layout” of your WordPress website. Whether you want a website for business, e-commerce, online portfolio website, you can choose from thousands theme within your WordPress dashboard and download your desired theme for free. Or, you can purchase premium design themes from all sorts of professional website templates providers and create your WordPress website with a more complex design and layout. All WordPress themes (free or paid) are fully customizable and you can further tweak your themes to better suite your needs.
How to Make a Website with WordPress: Step by Step
With WordPress, you can build a professional website in approximately 1 hour without any coding background! In this video, we will showcase how to build a website with NO steps skipped.
This is our final product:
http://businessdemo.doteasydemo.com/
You can download the WordPress theme from this link:
https://wordpress.doteasy.com/free-wordpress-theme-adventurous/
In particular, we showcase how to create a Booking Page with the Booking Calendar Plugin. With this plugin, you can create a page that offers booking service for your visitor. This feature will become extremely handy for hotel, plumbers, and other service-oriented business websites that require advanced appointment bookings. You can download the plugin from this link:
Booking Calendar – https://wordpress.doteasy.com/free-wordpress-plugin-booking-calendar/
We’ve also created a Contact Us page using this plugin:
https://wordpress.doteasy.com/free-wordpress-plugin-contact-us-form/
To install WordPress to your website, you’ll need a web hosting plan that supports PHP and MySQL. Please visit our web hosting plan for full details:
http://www.doteasy.com/web-hosting/
Our Unlimited Hosting plan is only at $3.98/month. Domain name included! This promotional price is only for new sign up. 1st Year Only!
How to Launch the Full Screen Editor in WordPress
“Distraction Free Writing” is a more elaborate way to describe the full screen editor in WordPress. Using the full screen can help you write more efficiently by preventing excess menus and boxes from clogging up the screen.
To go to the “Distraction Free Writing” Fullscreen Editor, just click on the full screen button in the WordPress editor.

The menu at the top of full screen mode will appear if you move the cursor to the top of the page. You can toggle between visual and text mode.
The visual editor options: Bold, italicize, create lists, block quote, add links, and insert media.

Text editor options: Add links, insert media.

Remember that in order to publish your post, you need to leave the full screen editor. First hit “Exit fullscreen” at the top left of the screen, then choose your publishing option.

Which editing mode do you prefer? Let us know what works for you!
Themes – Understanding what’s out there
We’ve shown you many free and ready to use templates. Now free is good, but not necessary the best and this is because your website has needs. In this article we will be going over the three general categories of themes.
Free Themes: These are themes that are ready to go and they are free to use. These themes unlike the other two categories of themes, while they look great visually, they may sometimes be lacking in functionality which you want to have on your website. Now because of repository of WordPress plug-ins available, we’re pretty sure you can find and install the functionality missing. We do suggest only downloading free themes from well-known WordPress theme providers such as WordPress Theme Directory.
Framework Themes: These themes provide building blocks so that you can create your own custom theme. Framework themes allow you efficiently create your own structure and style which you can apply to your entire site. Now with one framework theme, you can create many different styles with just one theme and developers may continue updating the theme so that more styles can be created. Now one limitation to framework themes is that they are usually very limited in functionality. These themes are generally more for advanced users. Also these themes can range anywhere from $60 to $200 in price. Some examples of framework themes:
Premium Themes: This is growing area for available themes. Now pricing can range anywhere from $30 – $60, but this may be a small price to pay consider the elaborate designs, vast selection of built-in features for customizations, and with some themes you can get direct support from the theme authors themselves. Often these themes will make your site look like it was custom designed for you. One of the deciding factors when picking the premium theme to use is to look at the number of downloads and rating that theme has. For a theme to be used by thousands of people is a good thing, it means the theme is obviously built will, easy to use and has all the right built-in functions. Now even though the most popular themes have been downloaded and used by thousands of other people, it is what you put into your website (i.e. content, pictures, etc.) that makes your site unique. Places where you can find premium themes:
Buying a Theme – What to look for?
Three item checklist before buying a theme:
- Appearance and Functionality
- Number of Sales, Reviews and Ratings
- Updates and Supports
Appearance and Functionality – This pretty self-explanatory where you should pick theme which you like the look of and has the functionality you want. Because a theme can have so many combinations of functionality and appearance, you may not get everything you want in one theme. Remember functionality can be added by finding the right add-on plug-in, and unless you’re willing to edit the PHP and/or CSS code yourself, it’s probably more important to find a theme that matches the look you are going after.
 Number of Sales, Ratings and Reviews – like buying anything online, these are your basic research criteria. Number of Sales is actually a two sided criteria. Not only are you checking out how well the theme itself is selling, but you also need to check out how well the developer’s other themes are doing as well. A good developer will have multiple themes with high number of sales. In terms of ratings and reviews, these speak to the popularity of the theme. Of course 5/5 stars themes would be awesome, but if it’s only rated by a few people, the overall results could be skewed.
  Whereas if the theme has 4.73/5 based on 8034 ratings you know the popularity and rating of the theme is a bit more true to life. Read reviews. Specifically look for good AND bad reviews. Reviews give you a much higher level of detail which a simple star rating cannot on how good a theme actually is. Now once you start reading the reviews, you will notice that sometimes the review is not only about the theme selected, but also about the developer (leading to next topic).
 Support and Updates – Now what happens after you buy a theme? Support is becoming a more common thing these days. Like I mention previously, when you start reading the reviews, you will notice that a lot of reviews are about the developer and not just about the theme itself. These reviews are crucial as this will indicate how responsive a developer is when you run in to problems using their theme. Also a good theme will generally come out with updates. Now updates can come in the form of new functionality or updates/fixes to existing ones. A theme that is continually updated means it is going to have better longevity as it will continue to work with newer versions of WordPress. And when your theme is updated, usually the developer will allow you to download the updated version of your theme and even include instructions on how to update your theme safely.
Now you are probably thinking, if I buy a popular theme, wouldn’t my site look like everyone else’s? Remember a theme is only a template for building your site. For most of the popular themes, they are popular because there are lot of customizations and functionality which means no two sites built are going to be exactly the same.
Moving your new WordPress from a Subfolder and into the Root Directory
When designing or testing a new WordPress site, a lot of the times the site is built within a subfolder so it does not affect the currently displaying site. When the work is done, most people will want to move their new site back into the root directory and have it display as the main site. This guide will take you through the steps of moving your new WordPress site.
When following our instructions, you should use your domain name when you see yourdomain.com in our examples. Same goes with the folder name where we use newsite (e.g. yourdomain.com/newsite), you should use your folder name where you have installed your new WordPress.
Part 1 – Make a Backup
As always, it is important to always make a backup copy of your entire site so in case a problem occurs you have something to restore back to. To learn how to make a backup copy of your site using cPanel, please view this KB entry.
Part 2 – Initial Setting Changes
Prior to moving your files, you will need to make some setting changes within your WordPress General Settings so that once your site is moved, the Admin Panel will display again.
1. Log into your WordPress Dashboard. (http://yourdomain.com/newsite/wp-admin/)
2. From the main dashboard, go to Settings -> General.
3. Look for the WordPress Address (URL) and change it:
• From: http://yourdomain.com/newsite/
• To: http://yourdomain.com/
4. Also change Site Address (URL):
• From: http://yourdomain.com/newsite/
• To: http://yourdomain.com/
5. Remember to Save Changes

One thing to keep in mind is that once you have hit save, you will start getting error screens when trying to access the site or dashboard and this is normal for this stage. This is because your WordPress site is now looking for the files under http://yourdomain.com and our next set of steps is to move the files across.
Part 3 – Moving your new site files
1. Log into your cPanel admin dashboard. (http://yourdomain.com/cpanel)
2. From the main cPanel area, look for the Files category and then click on the File Manager icon. Selected the Web Root (public_html) for the Directory you wish to open and also ensure the checkbox Show Hidden Files (dotfiles) is selected as well.
3. Once inside the File Manager, you will want to navigate to the folder you have your new WordPress site in. For example, a folder named newsite.
4. You will see a list of all the WordPress files and folders in the right hand panel. Highlight them all using the Select All icon.
5. Click on the Copy icon from the menu toolbar across the top of the page.
6. A popup will appear so you can enter the destination folder. Currently is should show as public_html/newsite. Remove the /newsite portion from the destination path so the only thing left is public_html.
7. Click the Copy File(s) button. This will copy the files up to the public_html folder.
8. Using the File Manager to navigate back to the public_html folder and you should see the same files as you have in your newsite folder.
9. You can now delete the newsite folder.
At this point you should now be able to see the site when going to http://yourdomain.com/ although it may look distorted or some links don’t work. The main thing we can access now is the dashboard where we can apply the finishing touches to get the site to display properly again.
Part 4 – Finishing touches
1. Log into your NEW WordPress admin dashboard. Which should be http://yourdomain.com/wp-admin/ or http://yourdomain.com/wp-login.php
2. In the dashboard menu go to Settings -> Permalinks and ensure the link structure is the same as your new URL. You may not need to make changes to this area, but need to hit save regardless to have WordPress display properly again.
If you have setup any custom scripts or custom website links anywhere on the site, these were created by hand and you will need to go into your dashboard to update and edit these by hand. Other than custom links, you should find your site functioning and displaying from http://yourdomain.com/ now without any issues.
Have You Done This Yet? Steps to Take After Installing WordPress: Part 1
Congratulations, you’ve successfully installed WordPress! But what to do now? Not to fear! We’ve devised a list of the top 10 essential steps to take next. Let’s dive right in.
1) Modify the Title, Tagline and Time Zone
This is the first step to making your site just a little more personal. In your WordPress Admin Dashboard, go to Settings -> General. You can change the timezone in the General Settings area as well. Be sure to save when you make a change!

2) Customize the Permalink Structure
In Settings, select Permalink and choose a new structure. We recommend that you choose the “Post Name” option. Again, don’t forget to save! This will make your site name more Google-friendly.

3) Keep Spam Out
Fight against spam comments by installing an anti-spam plugin. We recommend Antispam Bee– it’s free and can be a great first defence against spam.
4) Speed Up your Load Time
There are many ways to do this.
- First, install a caching plugin to reduce downloading time. A good free one to use is W3 Total Cache.
- Optimize your images – look into installing WP-SmushIt to reduce file sizes while maintaining the image quality.
- Install plugins to optimize your databases. WP-Optimize is a great one to clean up your databases.
A fast loading site will keep your visitors happy- and we all love happy visitors.
5) Use Social Sharing Plugins
This tip might be an unexpected item on the list- but this step is essential now more than ever. Allow your content to be shared and actually read. Check out the Social Share Button
Yes, we did promise to give you the top 10 steps to take after installing WordPress! Find the next 5 in Part Two.
Have You Done This Yet? Steps to Take After Installing WordPress: Part 2
After installing WordPress, you may find yourself wondering what you need to do next. This is the second part of our top 10 essential steps to take after installing WordPress. Find Part One here.
6) Arrange the Reading Settings
Want your latest posts to show up on your front page? Customize your page display to make it happen! Just go to the Settings area of your dashboard and choose the Reading settings.

7) Delete Unneeded Themes
If you’ve tried out a few different themes before settling on the one you’ve chosen, be sure to delete the unused ones. This will keep your site safer and lessen the chance of getting hacked. In the menu, find Appearance, then go to themes. Hover over the theme you want to delete, choose Theme Details, and delete the theme.
8) Beef Up Your Security
There are multiple ways to increase the security of your site. These are just a few ways to do it:
- Prevent against brute force attacks by installing a plugin. We recommend Lockdown WP Admin to hide the admin login page. Check out this video to see how to use this plugin to your advantage.
- Look into installing WordPress Exploit Scanner to keep you alert of any suspicious code in your file and database tables.
- We also recommend WordPress AntiVirus.
9) Install a SEO WordPress Plugin
You might have some amazing content on your site, but it would all be for naught if your posts never get a chance to be seen. Make your site SEO-friendly and optimize your posts for SEO with a plugin. We recommend WordPress SEO Plugin by Yoast.
10) Back It Up
You definitely don’t want to lose any of your website progress, so be sure to schedule some regular backups. Check out this video to learn how to manually backup your site in cPanel. If you don’t have the time to constantly backup your site, Doteasy also offers an automatic site backup service. It can be one less thing to worry about.
So that’s it, 10 essential steps to take after installing WordPress! Do you agree with our list? Let us know what you think.
Getting Started with WordPress
The following video playlist covers a wide range of WordPress topics: from “What is WordPress”, “How to Install WordPress”, to “Customizing a WordPress theme” and “WordPress Settings and Configurations”. The playlist contains total of 23 videos. Enjoy!
How to Add Captions to Your WordPress Images
If a picture’s worth a thousand words, imagine how much a picture with words would be. Probably even more!
If you’ve ever been curious about how to add captions to your WordPress images in a post or page, here’s a tutorial for you:
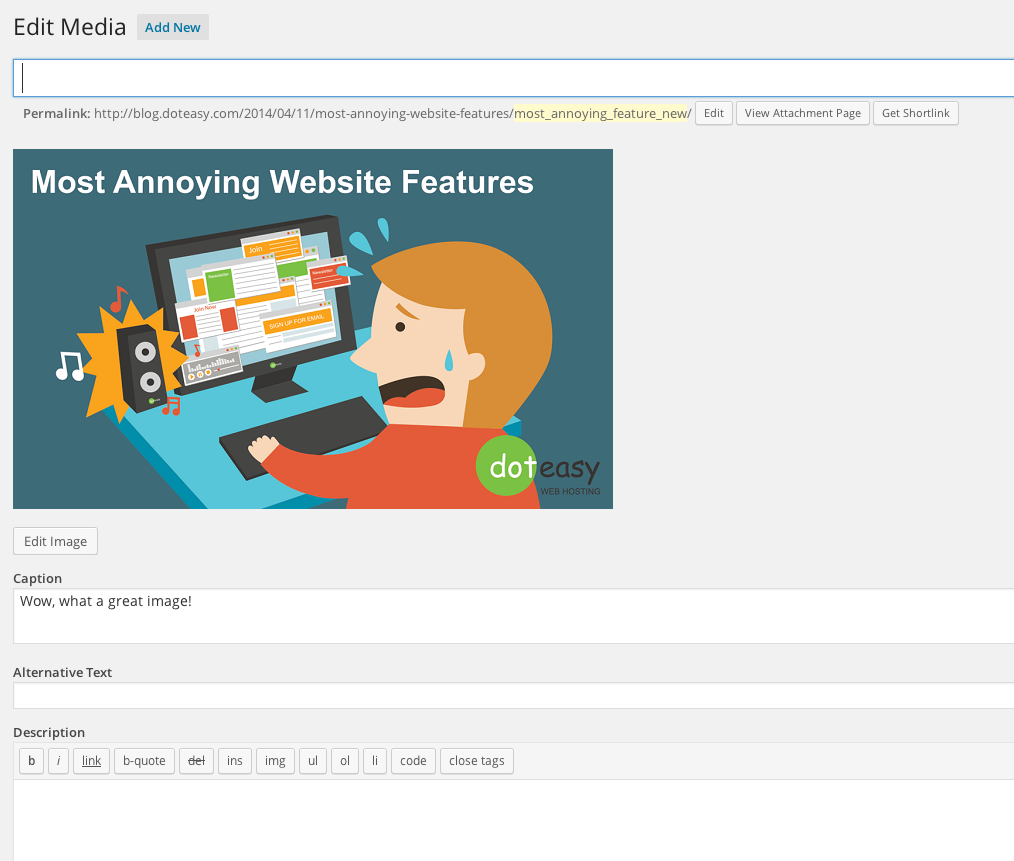
1) When you’re writing a post or a page, hit the “Add Media” button to upload an image.

2) Once the image is uploaded, you’ll have the option to fill out form boxes for a Title, Caption, Alt Text, and Description. The “Caption” is where you’ll be able to input text that will accompany the image and actually be displayed on the post.

3) Insert the image!
If you want to edit image captions on many photos in multiple posts, you don’t have to go to each individual post to edit them.
a) Just go to Media > Library

b) Hover your cursor over an image, and click “Edit”

c) You’ll be taken to an “Edit Media” window where you can edit your caption.
Whew that was easy! If you have any questions, shoot ’em our way in the comments below.
How to Customize the Number of Posts Displayed on a WordPress Blog Page
By default, a WordPress blog archive page will display 10 posts per page. But you’re not a by-default sort of person! Here’s how to customize the number of posts showing on one page:
1) After logging into your WordPress dashboard, head over to Settings > Reading

2) Here, you can change the “Blog pages show at most” to any number that you want.
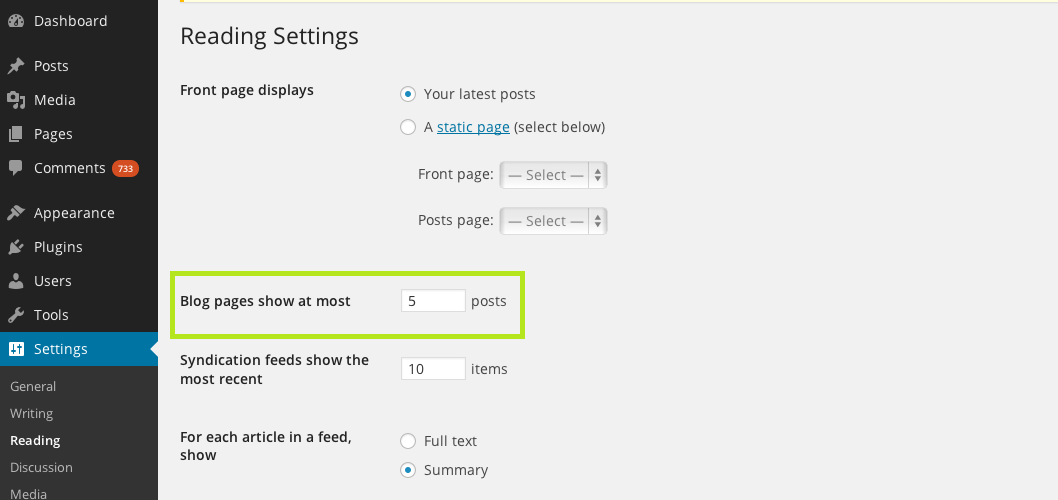
3) Remember to hit “Save Changes.”.
You’re done! Easy. Peasy.
Keep in mind that many visitors prefer to quickly scan through the archives to find an article of interest, so it might be beneficial to show more posts on one page. On the other hand, the more posts you have = the slower the page will take to load. Use your discretion and keep your readers in mind when you make the change.
About WordPress
WordPress Multisite Explained
WordPress features a powerful function called “Multisite”. Enabling multisite allows users to manage multiple WordPress websites from one WordPress installation. Each website in a network is independent, but the WordPress admin can modify the settings so that plugins and themes can be shared among the websites. When there are updates available for the shared theme and plugin, the site admin only needs to update the corresponding elements once instead of managing them individually. By disabling the network function, the site admin can isolate the plugins and themes access across all websites. To learn more the features and installation of WordPress Multisite, watch this video for full details.
WordPress.com and WordPress.org
Are you thinking about starting a blog?
When starting out, this question comes to the mind of every blogger. Is it better to pick the self-hosted WordPress.org or the free WordPress.com?
In this series, we will look at the pros and cons of both options. We will also show you how to use both on your Doteasy.com account, and also how to move from WordPress.com to WordPress.org.
What is WordPress?
WordPress is an open source content management system most often used as a blog publishing application.
WordPress is available in two forms: WordPress.com and WordPress.org. Both are free.
What is the difference between WordPress.com and WordPress.org?
With WordPress.com, the hosting and managing of the blog application is taken care of by the WordPress team.
With WordPress.org, you will need to install the blog application on your own server or web hosting provider.
Matt Mullenweg, founder of WordPress, uses this analogy to compare the two services, “It’s the difference of owning a home and just renting an apartment.”
Benefits of WordPress.com
- It’s free to setup
- Everything is taken care of by the WordPress team: setup, upgrades, backups, security, etc.
- You get extra traffic from WordPress’ Blog of the Day and tags
WordPress.com Cons
- Although there are currently over 100 themes available to choose from, you cannot run your own custom theme (unless you upgrade to the VIP program on WordPress.com)
- You cannot use it to post Adsense ads or affiliate links (unless you upgrade to the VIP program on WordPress.com)
- You cannot customize the PHP code
- You cannot upload plugins (unless you upgrade to the VIP program on WordPress.com)
How to run your WordPress.com blog on the Doteasy Basic Hosting account?
While you won’t be able to install the WordPress software on your Basic Hosting account, you can use the free Domain Forwarding function to forward your website to your WordPress.com blog so that when visitors type in your domain name in their browsers, they will be redirected to your WordPress.com blog.
To do so:
- Login to your Member Zone.
- Under the “Domain” section, select “Setup Domain Forward”
- Enter your WordPress.com blog URL into the “Destination URL” field.
- If you do not want your visitors to see your WordPress.com blog URL in their browser address bar, select the “Show yourdomain.com on browser’s address bar” option.
- When ready, click on the “Save Changes” button.
WordPress.com is ideal for…
WordPress.com is ideal for hobby bloggers – completely free but less options and freedom.
Benefits of WordPress.org
- You can upload any theme and plugin you want
- You can run ads as you wish on your website (ie. selling ad space on your blog)
- You have complete control to change the code of your blog
- The cost of self-hosting is less than upgrading your free WP.com to the premium plan
WordPress.org Cons
- You will need a web host that offers FTP, PHP and MySQL support
- You are responsible for stopping spam (although it can easily be done using the free Askimet plugin)
- You must upgrade the software manually and you have to manage backups yourself
How to install WordPress.org software on your Doteasy hosting account? I don’t have programming or scripting experience!
Don’t worry, we offer a one-step WordPress installation that eliminates all the database creation and file configuration procedures.
*NOTE: In order to run the WordPress.org software on your Doteasy account, you will need to be on the Unlimited Hosting plan – you need PHP and MySQL support to run the blog application.
To begin:
- Login to your account cPanel (you can do this via the “Site Admin Panel” link in your Member Zone)
- Under “Doteasy Softaculous Apps Installer”, select “WordPress”
- Select “Install”
- Specify the directory you wish to install WordPress and provide the admin login details for this new blog.
- When ready, click on the “Install WordPress” button.
We also provide you with a step-by-step setup guide with screenshots of the process. Check this page for details.
WordPress.org is ideal for…
WordPress.org offers more freedom and flexibility for bloggers as there are no restrictions on blog monetization, code and theme customization, plug-in installation, etc.
I am ready to move from WordPress.com to WordPress.org, can you help me?
Yes, certainly!
First of all, you will need to make sure you are subscribed to the Doteasy Unlimited Hosting plan – you will need PHP and MySQL support on your account to run the WordPress software on your account.
Then, once your Doteasy Ultra/Unlimited Hosting account has been activated, login to your Member Zone and click on the “Site Admin Panel” link – this will log you into your account admin panel for the one-click WordPress installation via Softaculous.
Once your WordPress software has been installed:
- Login to your WordPress.com account and select TOOLS – EXPORT from the menu on the left side. The export tool will compile your posts, pages, comments, categories and tags. This information is placed into a WXR file, or WordPress Extended RSS file.
- Once you’re finished, click on the Download Export File button to save it onto your computer.
- Then, login to your WordPress.org account admin panel (ie. http://www.yourdomain.com/wp-admin if you have installed in the root directory of your Doteasy hosting account)
- Next, click on TOOLS – IMPORT from the menu on the left. From the list of blogging systems, click on WordPress.
- Next, click on the Browse button and locate the WXR file you downloaded earlier. This will upload the file into your WordPress.org blog and will unpack all of the data contained in the file.
*Note: If your WXR file is large, you might want to contact us first to increase your account’s upload file size limit.
And if you ever have any questions, you can always contact us for assistance.
SEO Tips for Your WordPress Blog
Here are some SEO tips for your WordPress blog:
1. Alter the Permalink structure
Set your permalinks optimally for SEO. The permalink of your WordPress blog, by default, looks like http://yourdomain.com/?p=N, where N is the Post ID number. While it works on all server environments, it is not SEO-optimal.
You can easily change your permalink structure by clicking on the “Settings” tab and then “Permalinks” menu on the dashboard of WordPress. You can choose from the “common” structures provided or you can enter your own in the “Custom Structure” field using the structure tags. Make sure your do not put your domain URL in the permalinks field. You must use structure tags.
Structure tags:
- %year% – displays the 4-digit post year in the link (ie. 2013)
- %monthnum% – displays the 2-digit post month in the link (ie. 05)
- %day% – displays the day of the post in the link
- %postname% – displays the post name in the link
- %category% – displays the category of the post in the link
- %author% – displays the author name in the link
For example, if you want to display the post’s category and the title in the permalink, you will need to enter the following in the Custom Structure field: /%category%/%postname%/
2. Add a comprehensive SEO Pack
You can install the All in One SEO Pack plug-in. The plug-in allows you to optimize meta tags, keyword tags, description and add a custom title for your blog.
3. Optimize the home page and site title of your blog site
Use a keyword research tool to find good keyword phrases for your home page. Include the keyword phrases in the meta description, title tags and the content of your home page.
Also, the title of your site is one of the single most important factors in terms ranking in the search results. This article provides useful tips on how to write a good title for your page and post. Check this out.
To change your WordPress blog title, go to Settings and click “General”. Quick and easy.
4. Optimize your blog’s images
You can optimize your images by using keywords in the “Alt” attribute and the names of the images. Also, include an image description in the image title tag.
Images with huge file sizes will cause slow load time. Please remember that load time is one of the factors that determine your search rank. Check out this article about the 10 tips to speed up your WordPress load time.
5. Freshness
Have you ever asked yourself this question: “Why do I need to spend so much effort on SEO?” Well, it’s a pretty obvious answer: To Get More Visitors! So, here comes the million-dollar question: What is THE MOST important factor that can attract more visitors to your website? A beautiful website layout? Photo albums with clear description and “alt tag”? Certainly, these are important, but definitely not THE MOST important reasons.
Content is the king.
Your website content is the most influential factor that drives traffic (and search engine robots) to visit your website. If you want your visitors to come to your website on a regular basis, you will have to provide content on a regular basis, too. But, quantity will only get you so far. You have to make sure that your content is in good quality (e.g. How reliable is your source of the content? Does your content provide a valid argument? etc.).
A website with high quality content that is updated regularly can create visitor loyalty. Returning visitors can then bring in more new visitors by sharing your blog post on their social media channels and their blogs. The more readers that post your website on their personal blogs, the more backlinks you will get, which as a result, can further enhance your SEO performance.
We hope these 5 useful tips can help you achieve better SEO performances. If you have any comments and thoughts on SEO techniques, please feel free to drop by the SEO section on our Forums and share your ideas there.
What Makes WordPress Stand out from the Crowd
A recent research conducted in 2013 shows that 18% of all websites online are powered by WordPress. It is no doubt that WordPress is the most commonly used website builder. Therefore, many website developers are committed into develope themes and plugins for WordPress. Hence, it has the most theme and plugins selections available for users to download. Also, all websites built by WordPress are mobile-friendly and SEO friendly.
What is WordPress
WordPress is an open source website builder and content management system. The biggest advantage of building a website with WordPress is the flexibility of customizing both the look and functionality of your website. You can choose thousands of free, professional, fully customizable themes to jumpstart your website. Vast selection of plugins are available to enhance the functionality of your website. Coding experience is not required to build a WP website. With the WYSIWYG (What-You-See-Is-What-You-Get) dashboard and editor, you can publish your content, images, video, etc. on your website just like how you do it on Microsoft Word Processor. Fortune 500 companies, international firms, celebrities such as CNN, Forbes, NFL blog acquire WordPress websites.
WordPress Hosting Environment
When you ask yourself what is WordPress Hosting, you may arrive at different conclusions. The easiest way to think of this is simply the Hosting Environment in which you setup WordPress. That environment needs to have the technical capabilities needed to run WordPress along with the creative freedom needed for your site to flourish and grow. We try to make sure you have everything you need to run WordPress now and in the future.
Our Unlimited Hosting plan comes with a WordPress auto-installer that can help you easily, and quickly sew the seeds of your WordPress site within the our Hosting Environment. Unlimited Hosting is here to provide you with a protective PHP & MYSQL environment using up to date versions to shelter your ideas from the harmful insects of the internet so that your site can blossom into the beautiful creation that you envision. After you have cultivated your site to be everything you wish and more, it’s time to make it live and visible so that others can appreciate your work. Our stable servers have 99.98% up-time to make sure that when you and your visitors come to see your creation, it’s there waiting for everyone to behold.
There are times along the way where you may find yourself having questions when trying to make it work the way you wish. No need to worry as our friendly technical & support staff are here to lend a helping hand when you need it as we’d love to see your site flourish just as much as you do. Just simply contact us when you have questions about the site, please don’t hesitate to contact our support as they are waiting to assist you.
If you’re ready to get started, simply Sign-up Now!
How to Make a Website with WordPress: Step by Step
With WordPress, you can build a professional website in approximately 1 hour without any coding background! In this video, we will showcase how to build a website with NO steps skipped.
This is our final product:
http://businessdemo.doteasydemo.com/
You can download the WordPress theme from this link:
https://wordpress.doteasy.com/free-wordpress-theme-adventurous/
In particular, we showcase how to create a Booking Page with the Booking Calendar Plugin. With this plugin, you can create a page that offers booking service for your visitor. This feature will become extremely handy for hotel, plumbers, and other service-oriented business websites that require advanced appointment bookings. You can download the plugin from this link:
Booking Calendar – https://wordpress.doteasy.com/free-wordpress-plugin-booking-calendar/
We’ve also created a Contact Us page using this plugin:
https://wordpress.doteasy.com/free-wordpress-plugin-contact-us-form/
To install WordPress to your website, you’ll need a web hosting plan that supports PHP and MySQL. Please visit our web hosting plan for full details:
http://www.doteasy.com/web-hosting/
Our Unlimited Hosting plan is only at $3.98/month. Domain name included! This promotional price is only for new sign up. 1st Year Only!
How to Launch the Full Screen Editor in WordPress
“Distraction Free Writing” is a more elaborate way to describe the full screen editor in WordPress. Using the full screen can help you write more efficiently by preventing excess menus and boxes from clogging up the screen.
To go to the “Distraction Free Writing” Fullscreen Editor, just click on the full screen button in the WordPress editor.
The menu at the top of full screen mode will appear if you move the cursor to the top of the page. You can toggle between visual and text mode.
The visual editor options: Bold, italicize, create lists, block quote, add links, and insert media.
Text editor options: Add links, insert media.
Remember that in order to publish your post, you need to leave the full screen editor. First hit “Exit fullscreen” at the top left of the screen, then choose your publishing option.
Which editing mode do you prefer? Let us know what works for you!
Themes – Understanding what’s out there
We’ve shown you many free and ready to use templates. Now free is good, but not necessary the best and this is because your website has needs. In this article we will be going over the three general categories of themes.
Free Themes: These are themes that are ready to go and they are free to use. These themes unlike the other two categories of themes, while they look great visually, they may sometimes be lacking in functionality which you want to have on your website. Now because of repository of WordPress plug-ins available, we’re pretty sure you can find and install the functionality missing. We do suggest only downloading free themes from well-known WordPress theme providers such as WordPress Theme Directory.
Framework Themes: These themes provide building blocks so that you can create your own custom theme. Framework themes allow you efficiently create your own structure and style which you can apply to your entire site. Now with one framework theme, you can create many different styles with just one theme and developers may continue updating the theme so that more styles can be created. Now one limitation to framework themes is that they are usually very limited in functionality. These themes are generally more for advanced users. Also these themes can range anywhere from $60 to $200 in price. Some examples of framework themes:
Premium Themes: This is growing area for available themes. Now pricing can range anywhere from $30 – $60, but this may be a small price to pay consider the elaborate designs, vast selection of built-in features for customizations, and with some themes you can get direct support from the theme authors themselves. Often these themes will make your site look like it was custom designed for you. One of the deciding factors when picking the premium theme to use is to look at the number of downloads and rating that theme has. For a theme to be used by thousands of people is a good thing, it means the theme is obviously built will, easy to use and has all the right built-in functions. Now even though the most popular themes have been downloaded and used by thousands of other people, it is what you put into your website (i.e. content, pictures, etc.) that makes your site unique. Places where you can find premium themes:
Getting Started with WordPress
The following video playlist covers a wide range of WordPress topics: from “What is WordPress”, “How to Install WordPress”, to “Customizing a WordPress theme” and “WordPress Settings and Configurations”. The playlist contains total of 23 videos. Enjoy!
Plugins
Hardening WordPress Security
WordPress is an open source software and sometimes hackers may use security exploits to compromise your site. Therefore, we’ve created a few video tutorials to help you strengthening your WordPress security.
BulletProof Security Plugin
The first video is about BulletProof Security plugin configuration. This plugin is extremely important for protecting your website from brute force attack!
In particular, we also demonstrated how to whitelist IP address(es) so that only the people using the registered IP address(es) can access to the admin dashboard of your WordPress website. This can greatly reduce the chances of having brute force attacks. To do so, you will need to insert some simple codes (found from WordPress Codex page). Below is the code you need:
<Files wp-login.php>

# Block access to wp-admin.

order deny,allow

deny from all

# Add IP to Whitelist

allow from 111.222.333.444

</Files>
Please note that 111.222.333.444 represents your IP address. You will need to replace this with your own IP address when you customize your BulletProof settings.
After watching the first video, you will know where to put the above code and how to whitelist IP address for accessing to your admin panel.
Sucuri Security SiteCheck Malware Scanner
The second video tutorial is about Sucuri Security plugin.
Sucuri Security SiteCheck Malware Scanner checks your WordPress site for malware, spam, blacklisting and other security issues like .htaccess redirects, hidden eval code, etc.
Captcha Plugin
The third video tutorial is about captcha plugin
This plugin significantly reduce the chances of spammers attacking your website by asking a math question when submitting a request to your website (e.g. visitors are asked “what’s the answer for 2+3” when leaving comment). The plugin can work on comment section as well as the login page.
WordPress Multisite Explained
WordPress features a powerful function called “Multisite”. Enabling multisite allows users to manage multiple WordPress websites from one WordPress installation. Each website in a network is independent, but the WordPress admin can modify the settings so that plugins and themes can be shared among the websites. When there are updates available for the shared theme and plugin, the site admin only needs to update the corresponding elements once instead of managing them individually. By disabling the network function, the site admin can isolate the plugins and themes access across all websites. To learn more the features and installation of WordPress Multisite, watch this video for full details.
Creating a WordPress Web Page with Page Builder Plugin
WordPress is one of the most popular CMS platforms in today’s web design industry, largely because of the vast selection of available themes, free and commercial. But most often a theme is only a starting point – there is no such thing as a perfect theme – many website owners start with a great theme and tweak it to perfectly suit their needs.
Tweaking a WordPress theme often requires coding experience. But, with Page Builder plugin, you can create responsive column layouts using WordPress widgets. This plugin features the “drag-and-drop” interface so that it helps you precisely place the content wherever you want on your website. With Page Builder, you can simply customize your own WordPress theme.
To download the Page Builder Plugin, please visit our Featured Plugin page.
We’ve created a short video to demonstrate how quick and easy it is to create a WordPress web page using Page Builder. Enjoy
Adding a Forum to your WordPress website with bbPress Plugin
Making your website become more interactive is very essential to online success. To achieve such goal, you should consider adding a forum section to your website. Here are some benefits of having a forum on your website:
- Attract more traffic
- Forum readers tend to re-visit forums and regularly make posts.
- Comments and suggestions can help you improve the quality of your website content
With bbPress, you can easily add a forum to your WordPress website. bbPress is a WordPress plugin and you can find it from your dashboard. Simply search for bbPress under “Plugins > Add New” and it is available for you to download.
Creating Forums
Once the installation is completed, the “Forums” menu is added to the WordPress admin panel (see the image below).

To start off a new forum, simply hit “New Forum” and the steps are pretty much identically the same as how you make a post on your WordPress website.
Displaying Forums
Now that your forums are successfully created, you need to properly display these forums on the front end of your WordPress site. You can do so by creating a new WordPress page. Then give it a title (e.g. Forums, Community, Peer to Peer Support Forums, etc.). Most importantly, in the “Content” section, enter this shortcode:
![]()
Also, please make sure you turn off comments and trackbacks functions on this page. Once all these steps are made, publish this page. Go to “Appearance > Menus” section and add this page to your navigation menu.
Last but not least, make sure you go to “Settings” and click “General”. For “Membership”, choose “Anyone can register” so that your forum is open for new registrations.
Have fun setting up your forums. If you need any assistance, leave us a comment or contact us by visiting this page.
3 WordPress Plugins to Protect your Website against Malicious Codes
- WordPress Exploit Scanner – this plug-in will search through your website’s files and database tables and notifies you of any suspicious code. It also examines your active plugins for unusual filenames.
- TAC (Theme Authenticity Checker) – this plug-in searches the source files of installed themes on your blog for signs of malicious code.
- WordPress AntiVirus – this plug-in scans your theme directory to look for a WordPress permalink back door, which is a very malicious malware.
10 ways to speed up WordPress load times
The reason why you choose WordPress to build your website is because it is easy to use and you do not need any HTML background knowledge to create your website. So, when your website is done and completed, you work very hard to create more posts and content everyday. Your website traffic picks up and it starts to grow. To enhance your readers browsing experiences, you start using more WordPress plugins so that your website can have a few extra features (i.e. Social Media Share button, different language translators, etc). However, you start to realize that the more plugins and posts you make, the longer load time your website experiences. What should you do now?
Nobody likes slow websites. Nobody likes to wait around for websites to load every minute. Your (potential) readers will leave your website when it does not load for 10 seconds which means it is very important to optimize the load time of your WordPress website. Therefore, we have prepared a list with 10 easy tips to speed up your website.
1. Caching Plugin
Caching plugin helps your website improve its load speed because the plugin caches every aspect of your website. As a result, this will significantly reduce the download time. Among the different caching plugins available online, we recommend W3 Total Cache because it is very simple to use (and it’s FREE)!
2. Optimizing Image
Image file sizes are much larger than text files. If your website is image-oriented, it will take a much longer time to load your website. There is a free plugin called WP-Smushlt which can automatically help you reduce the file sizes of your website but does not reduce the quality of the image. Definitely check this out!
3. Another Image-related plugin: LazyLoad
This plugin will not only speed up your website load time but will also help your website lower the bandwidth by loading less data for your viewers who do not scroll down your website. For example, if your website is vertically long and requires readers to scroll down in order to view your entire page, with LazyLoad, the images on the lower side on your website will NOT load until your readers scroll down.
4. Optimizing databases
There are three plugins that we would like to recommend for optimizing your WordPress databases. The first one is WP-Optimize. This plugin, as the name suggests, optimizes your database by reducing the overhead of spams, drafts, tables, etc. Second, you can also consider installing WP-DBManger to help you schedule dates for database optimization.
Last, Revision Control is another great tool that can help you optimize your database. This plugin enables you to set the numbers of revisions you make for each post. WordPress, by default, stores all of your drafts indefinitely. By installing this powerful plugin, your database will be very lightweight compared to other websites without this plugin.
5. Removing unused plugins
The title says it all. If there are plugins that you do not use, simply delete them. Give it a try! Your site will load faster for sure!
6. Optimizing your home page
Your home page is the most important part that requires a quick load speed among all of your other pages because this is where your readers normally enter first. Here are a few tips to optimize your home page
- – Show excerpts of your posts.
- – Set fewer number of posts displayed on your home page (we recommend 5 posts)
- – Set the Social Media Share plugins to only display on the actual post page instead of the home page.
Remember the key: less is MORE!!
7. Enabling hotlink protection
Hotlinking happens when external websites direct a link to the images on your websites making your server load increase. In cPanel, there is a function called “HotLink Protection”. Once you enable the protection, you can eliminate this form of “bandwidth theft”.
8. cPanel “Optimize Website” Feature
Another great feature of cPanel! There is a feature under “Software/Services” in cPanel which is called “Optimize Website”. By enabling this feature, cPanel tweaks the way Apache will handle requests and will compress content before sending it to the visitor’s browsers.
9. Making use of Google PageSpeed Insights
PageSpeed Insights, developed by Google, is a tool that analyzes the content of a web page and provides suggestions to make that page load faster. Check out their official page for full details.
10. Good web hosting service company
A good web host can provide not only stable uptime and connection but also professional solutions and support when needed. At Doteasy, our in-house Customer Support agents are resourceful web technicians and experts. We can provide speedy solutions for WordPress and other website builder programs. It’s our goal to keep our customers up-to-date with the latest web hosting trends through our blog, our Scripts Library, and our how-to video tutorials on the YouTube channel.
Recently we launched the new state-of-the-art Solid State Drive (SSD) Hosting Service. This brand new hosting service utilizes web servers that are fitted with SSDs rather conventional hard disk drives. Typically, SSDs perform 30 times faster than HDDs. So, users can expect this hosting service to be much more responsive than traditional hosting services that run on HDDs. Database-driven websites such as WordPress and eCommerce websites can all be optimized with SSD Hosting plan. To learn more about our SSD Hosting plan, check out our feature page.
Lack of time to complete all these tips?
It takes a great amount of time to secure a website and maintain a quick load time. Therefore, we strongly recommend our customers to perform all of the above tips on your own. But, we understand that many of you do not have the time to do these tasks on your website. In this case, we can suggest to you our Managed Hosting plan which is an ideal solution for customers who need some extra help in maintaining their websites. Our Managed Hosting plan includes automated website backup as well as import, export, and optimization of your MySQL databases. To learn more, check out our Managed Hosting service feature page.
10 WordPress Plugins for Bloggers Making Money
There are at least two elements that make WordPress become the most popular content management system: themes and plugins. With the vast selection of available themes to install, you can build your WordPress website almost instantly with professional outlooks. Once your WordPress website is set up, you can further enhance the functionality of your website by installing different plugins. You can turn your WordPress website to a personal blog, e-commerce online store, online portfolio, etc by installing different plugins.
Many online individuals use WordPress to create their blogs and make considerable profits. For example, there are many “mommy bloggers” who share their tips on babysitting and frugal living styles, technology savvy putting up their products reviews on the latest gadgets, and travel bloggers posting their memorable pictures for their trips. These kinds of blogs often record massive traffic records. Hence, many related businesses (e.g. supermarkets, tech companies, travel agencies, etc.) approach them to place advertisements or promotion campaigns through their websites. With different plugins, WordPress owners can easily customize their website for different functions.
Although you have a wide selection of plugins to choose from, choosing the right ones is definitely a difficult task. That’s why we would like to highlight 10 plugins can help WordPress bloggers to turn their websites into a “profit-seeking” blog.
Security
CAPTCHA – this plugin significantly reduce the chances of spammers attacking your website by asking a math question when submitting a request to your website (e.g. visitors are asked “what’s the answer for 2+3” when leaving comment). The plugin can work on comment section as well as the login page.
WP-CopyProtect – this plugin protects your blog posts by preventing others copy your content. What that means is if your visitor tries to select the texts on your website, right click the mouse button, and try to copy the words, the plugin will block the “right-click-copy” function.
Traffic and Website Performances
Google Analytics – this plugin is pretty much self-explanatory. Google Analytics is a website traffic statistic tool that tells you where your visitors come from and how they interact with your website. To track your website traffic, all you need to do is to sign up at account on Google Analytics, install this plugin, enter your Google Analytics ID on your WordPress dashboard. Without the plugin, you would have to copy and paste the Google Analytics tracking code into each of your website pages.
WassUp Real Time Stat – this plugin is an alternative of Google Analytics. With this plugin you can see a full stats traffic report on the WordPress dashboard and even the real-time visitor activity.
WP-Optimize – this plugin helps you optimize your WordPress databases by reducing the overhead of spams, drafts, tablet, etc. An optimized WordPress website gives you a faster load time, which is benefitial to SEO performance as well as enhancing user experiences.
Facebook/Promotion
FB share – this plugin lets readers easily share your blog post on their Facebook timeline. The more your reader shares your posts, the faster your blog can be spread out on Facebook. This plugin eventually helps you attract more new visitors.
Facebook open graph – this plugin automatically adds meta tags on the head section of your posts. If you share your blog post (with images) on your Facebook timeline, the Facebook post you made will display a thumbnail of the image shown on your blog post. Moreover, if your blog post contains a video link from YouTube or Vimeo, by sharing the blog post on your Facebook wall, this plugin enhances your wall posts by adding clickable videos embed for these two video sharing websites. You can see the sample by reading the “Description” section of this plugin on WordPress.org
Contact us Form – A good contact us form can let your potential advertising clients easily contact you. Among the various contact form plugins in WordPress platform, “Contact Form 7” is one of the most popular one due to its flexibility and easy-to-customize feature.
Revenue
Before we go into the details of the plugins, we would like to introduce Google AdSense to you first. Google Adsense enables you to earn revenue by showing relevant and engaging ads alongside your website content. All you need to do is to sign up an account and copy and paste the ad codes on your website. Then ad banners will start displaying on your website. You earn revenue by clicks from your visitor. For bloggers who do have a full time job and treat blogging as their “leisure-part-time job”, Google Adsense is a convenient tool for you and helps you save the time to search and call new advertisers.
Once you sign up a Google AdSense account and have the ad codes ready, you can go to the “Widget” section in your WordPress dashboard. Add “Text” widget to your sidebar. Simply copy and paste the Google AdSense codes onto the Text widget and the ad banners will start displaying your sidebar.
There are a few guidelines that you need to follow in order to participate in the Google Adsense Program. One of the most important policies you need to know is that you can only display 3 image ads on one web page. For more details, check out this Google AdSense Page.
Since the space for placing ad banenr is quite limited on a WordPress website, we would like to recommend the following plugin for you.
Ad codes widget – this plugin lets clients install multiple ad banners in the same spot and supports shuffle-rotations. What that means is you can place more than one ad code into a single widget box. For example, you have two ads: a Google AdSense banner and an advertising banner from a local grocery store featuring their on-sale items. You can put both codes in the same widget box. What will happen is that the two ad banners will rotate automatically. So, your visitors may see the Google AdSense banner (or the grocery banner) when they read your blog post. By hitting “refresh” or going to a different page, they will see the ad banner for the grocery store (or, the Google AdSense banner). This plugin can maximize the ad spacing usage of your website.
Simple Custom Content Adder – this plugin lets you add some custom content to all of your posts. With this plugin, you can easily insert a Google AdSense text ad to the end of each post.
Have fun blogging and start earning more revenue with these 10 plugins!
How to Install Plugins
In this video, we’ll demonstrate how to install WordPress plugins.
This is the demo WordPress website we built earlier!
What is a WordPress Plugin
With different plugins, WordPress owners can easily customize their website for different functions. From Google Translator, local weather report, ads manager, social media share button, to PayPal Checkout button, you can install numerous plugins to cater your needs in just a few clicks within your dashboard.
Update Your WordPress MailPoet Plugin ASAP to Avoid Security Vulnerabilities
Sucuri, an online firm that offers website scanning, monitoring, and malware removal services, has recently found a serious security vulnerability in the MailPoet WordPress plugin. This plugin helps users create newsletters, post notifications and auto-responders and has a record of over 1.7 million downloads. Therefore, the impact is HUGE over the internet. The good news is that this vulnerability has been patched. If you run your WordPress website with this plugin, please update the plugin to 2.6.7 version ASAP.
What Exactly is the Problem?
The bug allows for any PHP file to be uploaded. What that means is the vulnerability can allow an attacker to use your website for phishing lures, sending SPAM, host malware, and much more. You can read the details about this security bug by visiting the Sucuri blog article.
Once again, update the plugin ASAP. In fact, you should always keep your WordPress version and all plugins up-to-date in order to keep your sites secured.
Update the WPTouch Plugin Immediately to Avoid Security Vulnerability
The online website scanning firm Sucuri has recently discovered a very dangerous vulnerability in the WPTouch Plugin for WordPress. This vulnerability allows attackers to upload files remotely to WordPress websites running this plugin with versions prior to 3.4.3. WPTouch Plugin has a record of over 5 million downloads. If your WordPress is running this plugin, please make sure to update the plugin immediately.
What Exactly is the Problem?
If your website has enabled the “Guest Registration Allowed” feature, a logged-in attacker can upload a backdoor (remote shell) inside your website’s directories and potentially take over your website. You can read the details about this security bug by visiting the Sucuri blog article.
Once again, update the plugin ASAP. In fact, you should always keep your WordPress version and all plugins up-to-date in order to keep your sites secured.

Update your Custom Contact Forms Plugin Immediately to Avoid Security Vulnerabilities
Sucuri, an online firm that offers website scanning, monitoring, and malware removal services, has recently found a serious security vulnerability in the Custom Contact Forms plugin. This plugin enables users to create customizable contact form on their WordPress websites and has a record of over 600,000 downloads. Therefore, the impact is pretty huge over the internet. The good news is that this vulnerability has been patched. If you run your WordPress website with this plugin, please update the plugin to 5.1.0.4 version ASAP.
What Exactly is the Problem?
The bug allows attackers to take control of the affected website without setting accounts beforehand. You can read the details about this security bug by visiting the Sucuri blog article.
Once again, update the plugin ASAP. In fact, you should always keep your WordPress version and all plugins up-to-date in order to keep your sites secured.
Update the Slider Revolution Premium plugin to Avoid Security Vulnerability
The Slider Revolution Premium plugin, one of the most downloaded slider plugins from the WordPress plugin marketplace Code Canyon, has been reported for a serious vulnerability found in it. This vulnerability is a type of Local File Inclusion (LFI) attack which allows attacker to access, review, and download a local file on the server. In particular, the attacker can download any file from the server and steal the database credentials. Consequently, the attacker can compromise the website through the database. You can read more about this vulnerability by visiting this page.
Update the plugin ASAP if you are currently using this on your WordPress website. In fact, you should always keep your WordPress version and all plugins up-to-date in order to keep your sites secured. And of course, perform a full site backup before you do any updates.
Update the WP eCommerce WordPress Plugin to Avoid Security Vulnerability
The WP eCommerce WordPress Plugin, with the record of over 2.9 million downloads, has been recently reported for a serious vulnerability found in it. The vulnerability can possibly lead to some users’ information leakage issues. If you have installed this plugin to your WordPress website, please update it to 3.8.14.4 version. And, make sure you perform a full site backup before updating the plugin.
What Exactly is the Problem?
Malicious attackers could use this vulnerability to get access and modify private information in the site that uses this plugin. For example, the vulnerability allows a malicious attacker to export all the user names and other confidential information of anyone that has previously made a purchase through the plugin. Furthermore, the attacker could also run administrative-related tasks without being authenticated as the administrator of the affected website. To learn more about this vulnerability, you can click this link to visit Sucuri, the online firm that offers website scanning, monitoring, and malware removal services.
Update the WP-Statistics WordPress Plugin to Avoid Security Vulnerability
WP-Statistics WordPress Plugin is comprehensive plugin for your WordPress visitor statistics. Recently a vulnerability has been found in all versions 8.3 and lower.
Quote Sucuri:
“An attacker can use Stored Cross Site Scripting (XSS) and Reflected XSS attack vectors to force a victim’s browser to perform administrative actions on its behalf. Leveraging this vulnerability, one could create new administrator account[s], insert SEO spam in legitimate blog posts, and a number of other actions within the WordPress’s admin panel.”
If you are using version 8.3 or lower, please upgrade immediately to version 8.3.1 or higher. For further details on the issue, please visit this page.
As always, keeping your WordPress and Plugins updated is vital. So is having a complete backup of your site. For worry free backup service which starts at $1.50/mo, Doteasy Auto Site Backup is a great deal for a great service.
Update the InfiniteWP Client WordPress plugin to Avoid Security Vulnerability
InfiniteWP allows users to manage unlimited number of WordPress sites from their own server. Recently a Vulnerability has been found in earlier verions of this plug-in.
Quote Sucuri:
“While doing a routine audit of our Website Firewall product, we discovered a vulnerability in the plugin that could be used by a malicious individual to 1) disable a users web site by putting it in maintenance mode and 2) allows the user to control the content of the maintenance page.”
If you are using a lower than version 1.3.8, please upgrade immediately to version 1.3.8 or higher. For further details on the issue, please visit this page.
As always, keeping your WordPress and Plugins updated is vital. So is having a complete backup of your site. For worry free backup service which starts at $1.50/mo, Doteasy Auto Site Backup is a great deal for a great service.
Update the WordPress Download Manager plugin to Avoid Security Vulnerability
The popular WP Download Manager plugin, with the record of over 850,000 downloads, helps users better manage, track, and control file downloads from your WordPress website. The plugin has been recently reported with a vulnerability issue found in earlier version of this plugin.
The WordPress site running this plugin is susceptible to code execution. With this vulnerability, the attacker may inject a backdoor and change the important credentials, including admin accounts. For full details, please visit this article published by Sucrui.
For those WP Download Manager plugin users, please update the plugin to version 2.7.5 ASAP. Don’t forget to perform a full site backup before updating the plugin.
Have You Done This Yet? Steps to Take After Installing WordPress: Part 1
Congratulations, you’ve successfully installed WordPress! But what to do now? Not to fear! We’ve devised a list of the top 10 essential steps to take next. Let’s dive right in.
1) Modify the Title, Tagline and Time Zone
This is the first step to making your site just a little more personal. In your WordPress Admin Dashboard, go to Settings -> General. You can change the timezone in the General Settings area as well. Be sure to save when you make a change!
2) Customize the Permalink Structure
In Settings, select Permalink and choose a new structure. We recommend that you choose the “Post Name” option. Again, don’t forget to save! This will make your site name more Google-friendly.
3) Keep Spam Out
Fight against spam comments by installing an anti-spam plugin. We recommend Antispam Bee– it’s free and can be a great first defence against spam.
4) Speed Up your Load Time
There are many ways to do this.
- First, install a caching plugin to reduce downloading time. A good free one to use is W3 Total Cache.
- Optimize your images – look into installing WP-SmushIt to reduce file sizes while maintaining the image quality.
- Install plugins to optimize your databases. WP-Optimize is a great one to clean up your databases.
A fast loading site will keep your visitors happy- and we all love happy visitors.
5) Use Social Sharing Plugins
This tip might be an unexpected item on the list- but this step is essential now more than ever. Allow your content to be shared and actually read. Check out the Social Share Button
Yes, we did promise to give you the top 10 steps to take after installing WordPress! Find the next 5 in Part Two.
Have You Done This Yet? Steps to Take After Installing WordPress: Part 2
After installing WordPress, you may find yourself wondering what you need to do next. This is the second part of our top 10 essential steps to take after installing WordPress. Find Part One here.
6) Arrange the Reading Settings
Want your latest posts to show up on your front page? Customize your page display to make it happen! Just go to the Settings area of your dashboard and choose the Reading settings.
7) Delete Unneeded Themes
If you’ve tried out a few different themes before settling on the one you’ve chosen, be sure to delete the unused ones. This will keep your site safer and lessen the chance of getting hacked. In the menu, find Appearance, then go to themes. Hover over the theme you want to delete, choose Theme Details, and delete the theme.
8) Beef Up Your Security
There are multiple ways to increase the security of your site. These are just a few ways to do it:
- Prevent against brute force attacks by installing a plugin. We recommend Lockdown WP Admin to hide the admin login page. Check out this video to see how to use this plugin to your advantage.
- Look into installing WordPress Exploit Scanner to keep you alert of any suspicious code in your file and database tables.
- We also recommend WordPress AntiVirus.
9) Install a SEO WordPress Plugin
You might have some amazing content on your site, but it would all be for naught if your posts never get a chance to be seen. Make your site SEO-friendly and optimize your posts for SEO with a plugin. We recommend WordPress SEO Plugin by Yoast.
10) Back It Up
You definitely don’t want to lose any of your website progress, so be sure to schedule some regular backups. Check out this video to learn how to manually backup your site in cPanel. If you don’t have the time to constantly backup your site, Doteasy also offers an automatic site backup service. It can be one less thing to worry about.
So that’s it, 10 essential steps to take after installing WordPress! Do you agree with our list? Let us know what you think.
5 Contact Form Plugins for WordPress
You’re in demand and people want to reach you. Adding a contact form on your website provides a simple way for your adoring visitors to get in touch with you.

Why Add a Contact Form?
While it is tempting to simply list a contact number on your website, if your visitors want to get in touch with you after business hours, you’re faced with a problem. Providing an email seems like a solution, but visitors often find that filling out a ready-made contact form seems to take less effort than sending an email. Make things easier for your friendly visitors and provide a handy-dandy contact form for their convenience.
Here are some of the most popular contact form plugins to check out:
Jetpack
Jetpack is a plugin by Automattic which features many “modules” with different features, such as site stats, social comments, and much more. If you have it installed, you can activate the Jetpack Contact module which will prompt you to create a very simple yet powerful form for your site. As a bonus, enabling Akismet will protect against spam.
Custom Contact Forms
Intuitive to use, Custom Contact Forms – as its name implies- is quite customizable. With a mostly drag and drop userface, beginners should be able to create contact forms with ease. CAPTCHA is easily added to ensure that only humans can submit a form.
Ninja
Ninja has an intuitive drag and drop interface that makes it quite easy to build your forms. Ninja also allows developers to make their own custom functionality. While the plugin itself is free, you need to pay for the extensions for added functionality. These paid add-ons are quite powerful so it might be worth your while to take a look.
Fast Secure Contact Form
As the name implies- Fast Secure Contact Form puts its energy into keeping your form secure. It supports CAPTCHA and has built in Akismet.
Contact Form 7
While one of the most popular free contact form plugins for WordPress, Contact Form 7 can be a little difficult for beginners to use, due to its non-intuitive interface and limited support. There are many third-party add-ons that are compatible with this plugin, but users do have to dig around the web to find them.
Give one of these contact form plugins a try and tell us your thoughts!
Update Multiple WordPress Plugins to Avoid Security Vulnerability
A great number of WordPress plugins (including many popular plugins with over millions of downloads) have been reported with vulnerability issues due to the misuse of the add_query_arg() and remove_query_arg() functions. These plugins include:
- Jetpack
- WordPress SEO
- Google Analytics by Yoast
- All in One SEO Pack
- Gravity Forms
- UpdraftPlus
- WP e-Commerce
- WP Touch
- Download Monitor
- Related Posts for WordPress
- My Calendar
- P3 Profiler
- Give
- Broken Link Checker
- Ninja Forms
As the problematic functions are very popular (functions used by developers to modify and add query strings to URLs within WordPress websites), there is a great chance that some other problematic plugins are not listed above. We strongly recommend that all WordPress users perform a full site backup and update the plugins ASAP. To learn more details about the vulnerability issues, please visit this blog article from Sucuri, the online website scanning firm.
Update Your WooCommerce Plugin to Avoid Object Injection Vulnerability
A dangerous “Object Injection” vulnerability has been discovered in the WooCommerce plugin, which could allow an attacker to download any file on the vulnerable server. Attackers potentially downloading critical files which can result in a full site compromise.
If your WooCommerce “PayPal Identity Token” is set, you are most at risk.
Update Immediately
If you are using a version lower than 2.3.11, update the plugin as soon as possible. Remember to back up your site before updating your WordPress and Plugins. For a worry-free backup service, subscribe to Doteasy Auto Site Backup for just $1.50/month. For more info about this vulnerability, please read this article from Sucuri.
Brute Force Attack Prevention Tips
A Brute Force Attack is when a hacker tries many combinations of usernames and passwords until they succeed in guessing the right combination. Due to the fact that at any one time there may be many concurrent login attempts occurring on your site via malicious automated robots, this also has a negative impact on your website load time and performance. Therefore, we highly recommend WordPress users to install this comprehensive plugin, Lockdown WP Admin.
Lockdown WP Admin features hiding WordPress Admin (/wp-admin/) when a user isn’t logged in. If a user isn’t logged in and attempts to access WP Admin directly, the WordPress site will return a 404 error page. Users can can also rename the login URL. We’ve created this video to walk through the configuration steps for this plugin.
Themes
WordPress Multisite Explained
WordPress features a powerful function called “Multisite”. Enabling multisite allows users to manage multiple WordPress websites from one WordPress installation. Each website in a network is independent, but the WordPress admin can modify the settings so that plugins and themes can be shared among the websites. When there are updates available for the shared theme and plugin, the site admin only needs to update the corresponding elements once instead of managing them individually. By disabling the network function, the site admin can isolate the plugins and themes access across all websites. To learn more the features and installation of WordPress Multisite, watch this video for full details.
Tips on how to find a free WordPress theme
Choosing a free WordPress theme can be a tough job, especially if you’re a beginner. While an attractive free theme might have caught your eye, be aware that it can contain malicious codes which can ultimately make your blog, website and web server become part of a zombie army of machines participating in an attack on some other website.
- Always select themes through the WordPress Free Themes Directory
- Visit the developer’s site. You can also check on the WordPress.org forums to know that developer’s reputation.
- Once you have the theme installed, install/activate the WordPress Exploit Scanner plug-in . This plug-in will search through your website’s files and database tables and notifies you of any suspicious code. It also examines your active plugins for unusual filenames.
Other useful plugins:
- TAC (Theme Authenticity Checker) – this plug-in searches the source files of installed themes on your blog for signs of malicious code.
- WordPress AntiVirus – this plug-in scans your theme directory to look for a WordPress permalink back door, which is a very malicious malware.
- Login Lockdown WordPress Security – this plug-in helps brute force password discovery by recording the IP address and timestamp of every failed WordPress login attempt. If more than a certain number of attempts are detected within a short period of time from the same IP range, the login function will be disabled.
General precautionary measures:
- Always have your WordPress software and WordPress plugins updated to the latest version
- Delete any unused themes and/or plugins installed but not activated
- Always have a strong password.
- Back up your WordPress database on a regular basis. You can also use these plug-ins to help you backup your blog.
Further/advanced reading:
How to Upload WordPress theme and Customization
In this video, we’ll demonstrate how to upload a WordPress theme from your computer & customize it.
This is the demo WordPress website we built earlier!
How to Install WordPress Theme
In this video, we’ll demonstrate how to find a WordPress theme in the dashboard & install it.
This is the demo WordPress website we built earlier!
Tweaking your WordPress Theme
WordPress is one of the most popular CMS platforms in today’s web design industry, largely because of the vast selection of available themes, free and commercial. But most often a theme is only a starting point – there is no such thing as a perfect theme – many website owners start with a great theme and tweak it to perfectly suit their needs.
Tweaking is not a privilege of those proficient in scripting or programming. There are many “customizations” you can make to your WordPress theme, even if your scripting/design knowledge and experience is limited.
Here are some of the easy customizations you can make to your WordPress theme.
- Edit the theme’s CSS
- Display post excerpts or full content
- Excluding/including a category
- Crafting page navigation
- Add something (anything) to the end of your blog posts
- Change the header image (if theme has a header image)
- Change the sidebar
- Add contact form
- Add Google Analytics tracking code
Edit Theme CSS
You can tweak colors, fonts, layouts, backgrounds and other visual elements by editing the Cascade Stylesheet, or CSS. Most of the time, you will find the theme’s CSS style in the file style.css. You can access this file via Appearance > Editor in your WordPress admin panel.
How to:
- Locate the attribute you want to edit. The attributes are identified by names indicating sections, such as body, header, etc.
- Make the changes to the code displayed between the curly brackets { }.
- Save the changes
For more information: http://codex.wordpress.org/CSS
Display Post Excerpts or Full Content
By default, your theme will display the full content of your blog posts on your home page. But if you would rather display only a short excerpt from the post as a little “teaser” to click through to the full article, you can tweak your theme to display excerpts.
To do this, you will need to get familiar with two tags:
1) The tag that displays your full post content is <?php the_content(); ?>
2) The tag that displays your post excerpt is <?php the_excerpt(); ?>
All you need to do is replace the content tag with the excerpt tag on your index.php file. Then, when you write a new post, enter in your article summary (or teaser) in the Excerpt field.
*Note* If no excerpt is set, it will automatically display the first few sentences of your blog post.
For more information on excerpts: http://codex.wordpress.org/Excerpt and http://codex.wordpress.org/Template_Tags/the_excerpt
Excluding/Including a Category
Let’s say you want to display posts from only one category on your homepage, or you want to exclude posts from one or more categories. Here’s how you do it:
Add this code where you want the posts to be displayed:
<?php query_posts(‘cat=3’); ?>
This code will display posts only from category ID 3. Change this number to whichever category ID you’d like to include.
If you want to do the opposite, all you need to do is add a “-“ in front of the category ID number, like this:
<?php query_posts(‘cat=-3’); ?>
This will exclude all posts which have the category ID 3.
For more information on query posts: http://codex.wordpress.org/Template_Tags/query_posts
Page Navigation
Many themes display all of your pages across the top of your site. But let’s say you’d like to exclude a page from the main navigation. Here’s one way you can do it:
Look for the following code (usually in the header.php file):
<?php wp_list_pages(); ?>
Change it to this:
<?php wp_list_pages(‘exclude=4’); ?>
This will tell WordPress to list all your pages except for the page with ID 4. You can change this number to whichever Page ID you’d like to exclude.
If you want to exclude more than one page, simply separate all the page IDs with a comma, like this:
<?php wp_list_pages(‘exclude=4,5,7,10’); ?>
For more information on WP list pages: http://codex.wordpress.org/Template_Tags/wp_list_pages
Add Something (Anything) to the End of Every Blog Post
Maybe you want to add a link to subscribe to your newsletter, an advertisement, etc. To the end of every blog post. Here’s how you do it:
The file you need to edit is the single.php. This is the template that displays your single articles. Open the file and find a good spot for the content you want to add. For example, to add a “Subscribe to newsletter” link after your post (and before the comments):
<?php the_content(); ?>
[the “subscribe to newsletter” link]<?php comments_template(); ?>
Changing the Header Image
Websites are often judged by their looks and the first impression comes from the header – it is the first thing that your visitors see.
Your theme’s header is specified in the header.php and the style.css files. In the header.php file, you may see:
<div id=”header”>
<div id=”headerimg”>
<h1>
<a href=”<?php echo get_option(‘home’); ?>”>
</h1>
<div class=”description”>
<?php bloginfo(‘description’); ?>
</div>
</div>
</div>
And in the styles.css file, you may see:
#header {
background: url(“<?php bloginfo(‘stylesheet_directory’); ?>/images/header.jpg”>
no-repeat bottom center; }
#headerimg {
margin: 10px 8px 0;
height: 192px;
width: 740px; }
To change the image file, replace the “header.jpg” with the name of the new image file you have uploaded to replace it. If it is in a different directory, replace the bloginfo() tag with the address of the image’s location.
If you are using an image that is the same size, then simply replace the image. But if the image is a different size, change the height and width in the #headerimg section.
For more information: http://codex.wordpress.org/Designing_Headers
Changing the Sidebar
The sidebar is the narrow vertical column placed either on the right or left-hand side of on your theme, and often jam-packed with lots of information to provide navigation for the visitor. The list of navigation item often includes Categories, Pages, Archives, Search, Recent Posts and Recent Comments.
The information displayed in the sidebar is controlled by the theme’s sidebar.php file.
Take a look at the file and you might see:
<?php wp_list_pages(‘title_li=<h2>Pages</h2>’); ?>
The Categories list might look like:
<li id=”categories”><?php _e(‘Categories:’); ?>
<ul>
<?php wp_list_cats(); ?>
</ul>
</li>
You can change the sidebar by editing the sidebar.php file. Or, you can also use the widgets subpanel ( located at Appearance > Widgets) in your WordPress admin panel to add and change your sidebar (this option does not require you to know any scripting). If you have installed and activated sidebar plugins and widgets, you will find these plugins listed in the widgets subpanel.
For more information: http://codex.wordpress.org/Customizing_Your_Sidebar
For more information on the Widgets subpanel: http://codex.wordpress.org/Widgets_SubPanel
Add Contact Form
By now, we all know that adding a mailto link on a website is the easiest way to increase the amount of spam in your inbox. Instead, use a contact form. WordPress has hundreds of contact form plugins you can choose from: http://wordpress.org/extend/plugins/search.php?q=contact. Contact Form 7 (http://contactform7.com/) and Cforms (http://www.deliciousdays.com/cforms-plugin/) are a couple great forms you should check out.
All you need to do is install the plugin, activate it and design your form, then add it to your page in just a click.
Add Google Analytics Tracking Code
Everyone wants to know how many visitors come to their website. Google Analytics is the most popular tool for tracking your website traffic. Adding the Google Analytic tracking code is very easy – setup an analytics account with Google and copy and paste the provided code before the </body> tag on the footer.php file (so that the code is embeded at the bottom of all pages of your website).
For more information: http://wordpress.org/extend/plugins/google-analytics-for-wordpress/
Choosing a WordPress Theme
You can either choose your WordPress theme within the dashboard or download themes from professional WordPress themes providers such as Themeforest and Template Monster. There are many free WordPress themes as well as premium design themes with a small amount of one-time fee. But, the choice is all yours! For more info, please check out here as we’ve hand picked a few wp theme providers for you to choose, both free and paid providers.
What is a WordPress Theme
WordPress theme is the “layout” of your WordPress website. Whether you want a website for business, e-commerce, online portfolio website, you can choose from thousands theme within your WordPress dashboard and download your desired theme for free. Or, you can purchase premium design themes from all sorts of professional website templates providers and create your WordPress website with a more complex design and layout. All WordPress themes (free or paid) are fully customizable and you can further tweak your themes to better suite your needs.
Themes – Understanding what’s out there
We’ve shown you many free and ready to use templates. Now free is good, but not necessary the best and this is because your website has needs. In this article we will be going over the three general categories of themes.
Free Themes: These are themes that are ready to go and they are free to use. These themes unlike the other two categories of themes, while they look great visually, they may sometimes be lacking in functionality which you want to have on your website. Now because of repository of WordPress plug-ins available, we’re pretty sure you can find and install the functionality missing. We do suggest only downloading free themes from well-known WordPress theme providers such as WordPress Theme Directory.
Framework Themes: These themes provide building blocks so that you can create your own custom theme. Framework themes allow you efficiently create your own structure and style which you can apply to your entire site. Now with one framework theme, you can create many different styles with just one theme and developers may continue updating the theme so that more styles can be created. Now one limitation to framework themes is that they are usually very limited in functionality. These themes are generally more for advanced users. Also these themes can range anywhere from $60 to $200 in price. Some examples of framework themes:
Premium Themes: This is growing area for available themes. Now pricing can range anywhere from $30 – $60, but this may be a small price to pay consider the elaborate designs, vast selection of built-in features for customizations, and with some themes you can get direct support from the theme authors themselves. Often these themes will make your site look like it was custom designed for you. One of the deciding factors when picking the premium theme to use is to look at the number of downloads and rating that theme has. For a theme to be used by thousands of people is a good thing, it means the theme is obviously built will, easy to use and has all the right built-in functions. Now even though the most popular themes have been downloaded and used by thousands of other people, it is what you put into your website (i.e. content, pictures, etc.) that makes your site unique. Places where you can find premium themes:
Buying a Theme – What to look for?
Three item checklist before buying a theme:
- Appearance and Functionality
- Number of Sales, Reviews and Ratings
- Updates and Supports
Appearance and Functionality – This pretty self-explanatory where you should pick theme which you like the look of and has the functionality you want. Because a theme can have so many combinations of functionality and appearance, you may not get everything you want in one theme. Remember functionality can be added by finding the right add-on plug-in, and unless you’re willing to edit the PHP and/or CSS code yourself, it’s probably more important to find a theme that matches the look you are going after.
Number of Sales, Ratings and Reviews – like buying anything online, these are your basic research criteria. Number of Sales is actually a two sided criteria. Not only are you checking out how well the theme itself is selling, but you also need to check out how well the developer’s other themes are doing as well. A good developer will have multiple themes with high number of sales. In terms of ratings and reviews, these speak to the popularity of the theme. Of course 5/5 stars themes would be awesome, but if it’s only rated by a few people, the overall results could be skewed. Whereas if the theme has 4.73/5 based on 8034 ratings you know the popularity and rating of the theme is a bit more true to life. Read reviews. Specifically look for good AND bad reviews. Reviews give you a much higher level of detail which a simple star rating cannot on how good a theme actually is. Now once you start reading the reviews, you will notice that sometimes the review is not only about the theme selected, but also about the developer (leading to next topic).
Support and Updates – Now what happens after you buy a theme? Support is becoming a more common thing these days. Like I mention previously, when you start reading the reviews, you will notice that a lot of reviews are about the developer and not just about the theme itself. These reviews are crucial as this will indicate how responsive a developer is when you run in to problems using their theme. Also a good theme will generally come out with updates. Now updates can come in the form of new functionality or updates/fixes to existing ones. A theme that is continually updated means it is going to have better longevity as it will continue to work with newer versions of WordPress. And when your theme is updated, usually the developer will allow you to download the updated version of your theme and even include instructions on how to update your theme safely.
Now you are probably thinking, if I buy a popular theme, wouldn’t my site look like everyone else’s? Remember a theme is only a template for building your site. For most of the popular themes, they are popular because there are lot of customizations and functionality which means no two sites built are going to be exactly the same.
Security
Hardening WordPress Security
WordPress is an open source software and sometimes hackers may use security exploits to compromise your site. Therefore, we’ve created a few video tutorials to help you strengthening your WordPress security.
BulletProof Security Plugin
The first video is about BulletProof Security plugin configuration. This plugin is extremely important for protecting your website from brute force attack!
In particular, we also demonstrated how to whitelist IP address(es) so that only the people using the registered IP address(es) can access to the admin dashboard of your WordPress website. This can greatly reduce the chances of having brute force attacks. To do so, you will need to insert some simple codes (found from WordPress Codex page). Below is the code you need:
<Files wp-login.php>

# Block access to wp-admin.

order deny,allow

deny from all

# Add IP to Whitelist

allow from 111.222.333.444

</Files>
Please note that 111.222.333.444 represents your IP address. You will need to replace this with your own IP address when you customize your BulletProof settings.
After watching the first video, you will know where to put the above code and how to whitelist IP address for accessing to your admin panel.
Sucuri Security SiteCheck Malware Scanner
The second video tutorial is about Sucuri Security plugin.
Sucuri Security SiteCheck Malware Scanner checks your WordPress site for malware, spam, blacklisting and other security issues like .htaccess redirects, hidden eval code, etc.
Captcha Plugin
The third video tutorial is about captcha plugin
This plugin significantly reduce the chances of spammers attacking your website by asking a math question when submitting a request to your website (e.g. visitors are asked “what’s the answer for 2+3” when leaving comment). The plugin can work on comment section as well as the login page.
3 WordPress Plugins to Protect your Website against Malicious Codes
- WordPress Exploit Scanner – this plug-in will search through your website’s files and database tables and notifies you of any suspicious code. It also examines your active plugins for unusual filenames.
- TAC (Theme Authenticity Checker) – this plug-in searches the source files of installed themes on your blog for signs of malicious code.
- WordPress AntiVirus – this plug-in scans your theme directory to look for a WordPress permalink back door, which is a very malicious malware.
10 ways to speed up WordPress load times
The reason why you choose WordPress to build your website is because it is easy to use and you do not need any HTML background knowledge to create your website. So, when your website is done and completed, you work very hard to create more posts and content everyday. Your website traffic picks up and it starts to grow. To enhance your readers browsing experiences, you start using more WordPress plugins so that your website can have a few extra features (i.e. Social Media Share button, different language translators, etc). However, you start to realize that the more plugins and posts you make, the longer load time your website experiences. What should you do now?
Nobody likes slow websites. Nobody likes to wait around for websites to load every minute. Your (potential) readers will leave your website when it does not load for 10 seconds which means it is very important to optimize the load time of your WordPress website. Therefore, we have prepared a list with 10 easy tips to speed up your website.
1. Caching Plugin
Caching plugin helps your website improve its load speed because the plugin caches every aspect of your website. As a result, this will significantly reduce the download time. Among the different caching plugins available online, we recommend W3 Total Cache because it is very simple to use (and it’s FREE)!
2. Optimizing Image
Image file sizes are much larger than text files. If your website is image-oriented, it will take a much longer time to load your website. There is a free plugin called WP-Smushlt which can automatically help you reduce the file sizes of your website but does not reduce the quality of the image. Definitely check this out!
3. Another Image-related plugin: LazyLoad
This plugin will not only speed up your website load time but will also help your website lower the bandwidth by loading less data for your viewers who do not scroll down your website. For example, if your website is vertically long and requires readers to scroll down in order to view your entire page, with LazyLoad, the images on the lower side on your website will NOT load until your readers scroll down.
4. Optimizing databases
There are three plugins that we would like to recommend for optimizing your WordPress databases. The first one is WP-Optimize. This plugin, as the name suggests, optimizes your database by reducing the overhead of spams, drafts, tables, etc. Second, you can also consider installing WP-DBManger to help you schedule dates for database optimization.
Last, Revision Control is another great tool that can help you optimize your database. This plugin enables you to set the numbers of revisions you make for each post. WordPress, by default, stores all of your drafts indefinitely. By installing this powerful plugin, your database will be very lightweight compared to other websites without this plugin.
5. Removing unused plugins
The title says it all. If there are plugins that you do not use, simply delete them. Give it a try! Your site will load faster for sure!
6. Optimizing your home page
Your home page is the most important part that requires a quick load speed among all of your other pages because this is where your readers normally enter first. Here are a few tips to optimize your home page
- – Show excerpts of your posts.
- – Set fewer number of posts displayed on your home page (we recommend 5 posts)
- – Set the Social Media Share plugins to only display on the actual post page instead of the home page.
Remember the key: less is MORE!!
7. Enabling hotlink protection
Hotlinking happens when external websites direct a link to the images on your websites making your server load increase. In cPanel, there is a function called “HotLink Protection”. Once you enable the protection, you can eliminate this form of “bandwidth theft”.
8. cPanel “Optimize Website” Feature
Another great feature of cPanel! There is a feature under “Software/Services” in cPanel which is called “Optimize Website”. By enabling this feature, cPanel tweaks the way Apache will handle requests and will compress content before sending it to the visitor’s browsers.
9. Making use of Google PageSpeed Insights
PageSpeed Insights, developed by Google, is a tool that analyzes the content of a web page and provides suggestions to make that page load faster. Check out their official page for full details.
10. Good web hosting service company
A good web host can provide not only stable uptime and connection but also professional solutions and support when needed. At Doteasy, our in-house Customer Support agents are resourceful web technicians and experts. We can provide speedy solutions for WordPress and other website builder programs. It’s our goal to keep our customers up-to-date with the latest web hosting trends through our blog, our Scripts Library, and our how-to video tutorials on the YouTube channel.
Recently we launched the new state-of-the-art Solid State Drive (SSD) Hosting Service. This brand new hosting service utilizes web servers that are fitted with SSDs rather conventional hard disk drives. Typically, SSDs perform 30 times faster than HDDs. So, users can expect this hosting service to be much more responsive than traditional hosting services that run on HDDs. Database-driven websites such as WordPress and eCommerce websites can all be optimized with SSD Hosting plan. To learn more about our SSD Hosting plan, check out our feature page.
Lack of time to complete all these tips?
It takes a great amount of time to secure a website and maintain a quick load time. Therefore, we strongly recommend our customers to perform all of the above tips on your own. But, we understand that many of you do not have the time to do these tasks on your website. In this case, we can suggest to you our Managed Hosting plan which is an ideal solution for customers who need some extra help in maintaining their websites. Our Managed Hosting plan includes automated website backup as well as import, export, and optimization of your MySQL databases. To learn more, check out our Managed Hosting service feature page.
WordPress Security 101
WordPress is an open source software and sometimes hackers may use security exploits to compromise your site. Here are some things that you can do to better protect your site.
1. Always be up to date and use the latest version of WordPress. Older versions of WordPress are not maintained with security updates.
2. Make sure your plugins/themes are always updated. Also, if you are not using a specific plugin/theme, delete it from the system.
3. Use an admin ID other than ‘admin’ in new WordPress installations. If you are already using ‘admin’ as your admin ID, you can create a new one and remove the old ‘admin’ ID. To setup a new Admin and remove the old Admin:
a) Go to WordPress admin panel.
b) Click on “Users” to add a new user, and set its role to administrator.
c) Remove the ‘admin’ user after the new user is created. Check out this short video to see the steps for removing the existing “admin” ID
4. Many vulnerabilities can be avoided with good security habits. A strong password is an important aspect of this.
5. Make backups of your site and database on regular basis.
For the more advanced users, we also suggest the following changes:
i. File permissions: Allowing write access to your files can potentially be dangerous. It is best to lock down your file permissions as much as possible and to loosen those restrictions only when needed.
Folder: 755
php/html, and other files: 644
wp-config.php: 600
ii. Secure the wp-admin folder: It can be done through password protection inside cPanel.
https://kb.doteasy.com/questions/435/How+to+password+protect+a+directory
iii. Disable File Editing: The WordPress Dashboard by default allows administrators to edit PHP files, such as plugin and theme files. This is often the first tool that an attacker will use since it allows code execution. You can disable editing from the Dashboard. Placing this line in the wp-config.php file is the equivalent to removing the ‘edit_themes’, ‘edit_plugins’ and ‘edit_files’ capabilities for all users:
define(‘DISALLOW_FILE_EDIT’, true);
This will not prevent an attacker from uploading malicious files to your site, but it will stop some attacks.
You can download the wp-config.php file through FTP, use a text editor to add the code to the very bottom of the file, save it, and then publish it to the server. Make sure you set the permission of the file to 600 after the upload.
If you have any problems making any of our suggested changes, please do not hesitate to contact our Customer Service Support Team.
7 Common WordPress Mistakes (Solutions Provided)
We all make mistakes. But, learning from our mistakes makes the lesson meaningful.
Below are 7 common mistakes that WordPress users often make. By outlining them, we hope this list can help prevent other WordPress users from running into the same problems in the future.
1. All about “username”
There are mainly 2 types of popular mistakes under this category and let’s go over each of them in detail. The first common one we see is: clients using “admin” as username. Recently, WordPress has been attacked by a massive botnet of tens of thousands of computers and the attack was mainly targeting websites with “admin” as the usernames. “Admin” is the most common username that people choose to create. It would make sense for hackers to attack the websites with “easy-to-hack” usernames first.
Solution: don’t use “admin” as your username when you install WordPress. However, if you’ve already used it, check out this article to see how you can change the WordPress username (by default, WordPress does not allow users to change their usernames).
Also, you have the option of inserting your first name and last name when creating an account for your WordPress login. If you manually insert a name for your account, all your posts will no longer display your username as the author of the posts. Instead, it will display your first name and last name (Note: you are NOT required to insert a GENIUNE first and last name!). Differentiating your username from your “account display name” decreases the chances of hackers successfully guessing your login-name.
Another common mistake in regards to WordPress username is keeping the unused user account. For example, if you hire a contract webmaster to take care of your WordPress website, you should always remove the account once the service ends. Remember, the more user account you have on your site, the greater chance the hackers can access to your website.
Solution: if you don’t need an account, delete it right away.
2. All about “password”
Did you know that the most common passwords are actually “password”, “123456”, and “12345678”? Compiled by a password management company, these results were gathered using the data that hackers have previously posted online.
So, imagine you have a username “admin” with a password “password”, what is the level of difficulty for hackers to attack your website?
Solution: Create a stronger password (e.g. contains at least a letter, a number, and a symbol). Also, regularly update the password!
3. Never backing up your website
Myth: “Why should I back up my own site? Doesn’t my web hosting service provider backup my website anyways?”
Answer: Yes, we do backups of your website, but the backups are mainly for our benefits. All the backup files we make (e.g. in one particular server) are jumbled together. Also, when we perform our backups, it may not be the moment you make changes to your websites. So, chances are, we may not include the latest changes of your website.
Solution: Log in to cPanel and do a full backup of your website regularly. If you don’t know how, read this blog post.
4. Too many categories
The architecture and planning of a website greatly affect its SEO performance. Moreover, leaving excessive categories will slow down your website load time.
Solution: One of the greatest features of WordPress is the capability of using “tags”. “Tag” is very similar to category and it helps WordPress owners to group posts based on the keywords they manually set. So, try to limit the usage of categories and make use of tags to group different posts.
5. Ignoring WordPress and plugin updates
WordPress regularly releases updates for security reasons. If you ignore them, you would probably know the consequences right? The same problem goes to plugins too. Remember this: there are reasons why plugin developers release updates. So when you see the update signs, give them a click immediately!
Solution: Besides regularly logging in to your WordPress Dashboard to see if there are any updates available for download, you may consider using Softaculous to install WordPress. The benefit of using Softaculous to install WordPress is that it will send out email notifications for users when there are new updates release for the installed scripts. For full details, check out our article in our Scripts Library.
6. All about plugins
Speaking of plugins, one of the most common mistakes a WordPress user makes is: missing out the great features of certain plugins. For example, you have a photo WordPress website and you often experience slow load time. You never have the time to investigate the reason behind it. In fact, your high quality images slow down the website. To solve this problem, you can simply install a caching plugin as well as other tools that can help you reduce the file sizes of your website while keeping the quality of the images. To learn more how these plugins help you increase the load time of your WordPress website, check out this article.
While many WordPress users miss out the great features of plugins, on the contrary, there are other WordPress users who like keeping the unused plugin files on the website. Remember: the more files you have on your website, the longer time it takes to load your website. It makes sense to store the files on your website if you are actively using them. But for those that are not in use, why not remove these unnecessary plugins and have a faster website load time?
7. Unfriendly Permalink Structure
By default, WordPress has this setting for permalink:
/?p=123
If you see a blog post with this URL (e.g. YourWordPressBlog.com/?p=123), can you guess what this post is about? If you can’t tell what this blog post is about, your readers (including search engine robots) will have the same experience too.
Solution: login to your WordPress Dashboard. Go to “Settings” and click “Permalinks”. There are 6 settings for you to choose and you can decide which one that fits your need the most.
We hope this article gives you an opportunity to review some of the settings on your WordPress website as well rectify any mistakes. If you need help in solving the problems, our Customer Support Team is happy to assist you. Simply contact us by our live chat, telephone, or customer support ticket system.
Increasing WordPress Security
Recently, WordPress has been attacked by a massive botnet of tens of thousands of computers. In particular, the attack mainly targeted WordPress websites with “admin” as the usernames and tried numerous possible passwords.
If you are planning to install WordPress on your website, please make sure that you DO NOT set the username as “admin”. This will greatly reduce the chances of being compromised. Also, here are a few extra tips on increasing your WordPress security:
- – Always keep your WordPress version and plugins up-to-date!
- – Remove unused plugins
- – Avoid usernames with words that contain your domain name
- – Create a stronger password (e.g. password that contains at least a number, a letter, and a symbol)
- – Update your username and password regularly
- – Check out our WordPress Security 101 article
WordPress, by default, does not allow users to change the username once it is created. So, now the question is:
“What can I do if I’ve already set ‘admin’ as my username? Is there any way I can change it?”
Please watch this short video to see how quick and easy it is to change the username in WordPress in an alternative way.
If you have troubles in updating your username in WordPress, please contact us and our Customer Support Team is happy to assist you. Also, share this article on your Facebook, Twitter, and Google+ account to help spread out this useful tip. A recent study shows that there are approximately 64 million WordPress websites (18% of all websites) in the world. By sharing this tip, you are helping to create a more secured internet!
Update Your WordPress MailPoet Plugin ASAP to Avoid Security Vulnerabilities
Sucuri, an online firm that offers website scanning, monitoring, and malware removal services, has recently found a serious security vulnerability in the MailPoet WordPress plugin. This plugin helps users create newsletters, post notifications and auto-responders and has a record of over 1.7 million downloads. Therefore, the impact is HUGE over the internet. The good news is that this vulnerability has been patched. If you run your WordPress website with this plugin, please update the plugin to 2.6.7 version ASAP.
What Exactly is the Problem?
The bug allows for any PHP file to be uploaded. What that means is the vulnerability can allow an attacker to use your website for phishing lures, sending SPAM, host malware, and much more. You can read the details about this security bug by visiting the Sucuri blog article.
Once again, update the plugin ASAP. In fact, you should always keep your WordPress version and all plugins up-to-date in order to keep your sites secured.
Update the WPTouch Plugin Immediately to Avoid Security Vulnerability
The online website scanning firm Sucuri has recently discovered a very dangerous vulnerability in the WPTouch Plugin for WordPress. This vulnerability allows attackers to upload files remotely to WordPress websites running this plugin with versions prior to 3.4.3. WPTouch Plugin has a record of over 5 million downloads. If your WordPress is running this plugin, please make sure to update the plugin immediately.
What Exactly is the Problem?
If your website has enabled the “Guest Registration Allowed” feature, a logged-in attacker can upload a backdoor (remote shell) inside your website’s directories and potentially take over your website. You can read the details about this security bug by visiting the Sucuri blog article.
Once again, update the plugin ASAP. In fact, you should always keep your WordPress version and all plugins up-to-date in order to keep your sites secured.
Update your Custom Contact Forms Plugin Immediately to Avoid Security Vulnerabilities
Sucuri, an online firm that offers website scanning, monitoring, and malware removal services, has recently found a serious security vulnerability in the Custom Contact Forms plugin. This plugin enables users to create customizable contact form on their WordPress websites and has a record of over 600,000 downloads. Therefore, the impact is pretty huge over the internet. The good news is that this vulnerability has been patched. If you run your WordPress website with this plugin, please update the plugin to 5.1.0.4 version ASAP.
What Exactly is the Problem?
The bug allows attackers to take control of the affected website without setting accounts beforehand. You can read the details about this security bug by visiting the Sucuri blog article.
Once again, update the plugin ASAP. In fact, you should always keep your WordPress version and all plugins up-to-date in order to keep your sites secured.
Update the Slider Revolution Premium plugin to Avoid Security Vulnerability
The Slider Revolution Premium plugin, one of the most downloaded slider plugins from the WordPress plugin marketplace Code Canyon, has been reported for a serious vulnerability found in it. This vulnerability is a type of Local File Inclusion (LFI) attack which allows attacker to access, review, and download a local file on the server. In particular, the attacker can download any file from the server and steal the database credentials. Consequently, the attacker can compromise the website through the database. You can read more about this vulnerability by visiting this page.
Update the plugin ASAP if you are currently using this on your WordPress website. In fact, you should always keep your WordPress version and all plugins up-to-date in order to keep your sites secured. And of course, perform a full site backup before you do any updates.
Update the WP eCommerce WordPress Plugin to Avoid Security Vulnerability
The WP eCommerce WordPress Plugin, with the record of over 2.9 million downloads, has been recently reported for a serious vulnerability found in it. The vulnerability can possibly lead to some users’ information leakage issues. If you have installed this plugin to your WordPress website, please update it to 3.8.14.4 version. And, make sure you perform a full site backup before updating the plugin.
What Exactly is the Problem?
Malicious attackers could use this vulnerability to get access and modify private information in the site that uses this plugin. For example, the vulnerability allows a malicious attacker to export all the user names and other confidential information of anyone that has previously made a purchase through the plugin. Furthermore, the attacker could also run administrative-related tasks without being authenticated as the administrator of the affected website. To learn more about this vulnerability, you can click this link to visit Sucuri, the online firm that offers website scanning, monitoring, and malware removal services.
Update the WP-Statistics WordPress Plugin to Avoid Security Vulnerability
WP-Statistics WordPress Plugin is comprehensive plugin for your WordPress visitor statistics. Recently a vulnerability has been found in all versions 8.3 and lower.
Quote Sucuri:
“An attacker can use Stored Cross Site Scripting (XSS) and Reflected XSS attack vectors to force a victim’s browser to perform administrative actions on its behalf. Leveraging this vulnerability, one could create new administrator account[s], insert SEO spam in legitimate blog posts, and a number of other actions within the WordPress’s admin panel.”
If you are using version 8.3 or lower, please upgrade immediately to version 8.3.1 or higher. For further details on the issue, please visit this page.
As always, keeping your WordPress and Plugins updated is vital. So is having a complete backup of your site. For worry free backup service which starts at $1.50/mo, Doteasy Auto Site Backup is a great deal for a great service.
Update the InfiniteWP Client WordPress plugin to Avoid Security Vulnerability
InfiniteWP allows users to manage unlimited number of WordPress sites from their own server. Recently a Vulnerability has been found in earlier verions of this plug-in.
Quote Sucuri:
“While doing a routine audit of our Website Firewall product, we discovered a vulnerability in the plugin that could be used by a malicious individual to 1) disable a users web site by putting it in maintenance mode and 2) allows the user to control the content of the maintenance page.”
If you are using a lower than version 1.3.8, please upgrade immediately to version 1.3.8 or higher. For further details on the issue, please visit this page.
As always, keeping your WordPress and Plugins updated is vital. So is having a complete backup of your site. For worry free backup service which starts at $1.50/mo, Doteasy Auto Site Backup is a great deal for a great service.
Update the WordPress Download Manager plugin to Avoid Security Vulnerability
The popular WP Download Manager plugin, with the record of over 850,000 downloads, helps users better manage, track, and control file downloads from your WordPress website. The plugin has been recently reported with a vulnerability issue found in earlier version of this plugin.
The WordPress site running this plugin is susceptible to code execution. With this vulnerability, the attacker may inject a backdoor and change the important credentials, including admin accounts. For full details, please visit this article published by Sucrui.
For those WP Download Manager plugin users, please update the plugin to version 2.7.5 ASAP. Don’t forget to perform a full site backup before updating the plugin.
Have You Done This Yet? Steps to Take After Installing WordPress: Part 1
Congratulations, you’ve successfully installed WordPress! But what to do now? Not to fear! We’ve devised a list of the top 10 essential steps to take next. Let’s dive right in.
1) Modify the Title, Tagline and Time Zone
This is the first step to making your site just a little more personal. In your WordPress Admin Dashboard, go to Settings -> General. You can change the timezone in the General Settings area as well. Be sure to save when you make a change!
2) Customize the Permalink Structure
In Settings, select Permalink and choose a new structure. We recommend that you choose the “Post Name” option. Again, don’t forget to save! This will make your site name more Google-friendly.
3) Keep Spam Out
Fight against spam comments by installing an anti-spam plugin. We recommend Antispam Bee– it’s free and can be a great first defence against spam.
4) Speed Up your Load Time
There are many ways to do this.
- First, install a caching plugin to reduce downloading time. A good free one to use is W3 Total Cache.
- Optimize your images – look into installing WP-SmushIt to reduce file sizes while maintaining the image quality.
- Install plugins to optimize your databases. WP-Optimize is a great one to clean up your databases.
A fast loading site will keep your visitors happy- and we all love happy visitors.
5) Use Social Sharing Plugins
This tip might be an unexpected item on the list- but this step is essential now more than ever. Allow your content to be shared and actually read. Check out the Social Share Button
Yes, we did promise to give you the top 10 steps to take after installing WordPress! Find the next 5 in Part Two.
Have You Done This Yet? Steps to Take After Installing WordPress: Part 2
After installing WordPress, you may find yourself wondering what you need to do next. This is the second part of our top 10 essential steps to take after installing WordPress. Find Part One here.
6) Arrange the Reading Settings
Want your latest posts to show up on your front page? Customize your page display to make it happen! Just go to the Settings area of your dashboard and choose the Reading settings.
7) Delete Unneeded Themes
If you’ve tried out a few different themes before settling on the one you’ve chosen, be sure to delete the unused ones. This will keep your site safer and lessen the chance of getting hacked. In the menu, find Appearance, then go to themes. Hover over the theme you want to delete, choose Theme Details, and delete the theme.
8) Beef Up Your Security
There are multiple ways to increase the security of your site. These are just a few ways to do it:
- Prevent against brute force attacks by installing a plugin. We recommend Lockdown WP Admin to hide the admin login page. Check out this video to see how to use this plugin to your advantage.
- Look into installing WordPress Exploit Scanner to keep you alert of any suspicious code in your file and database tables.
- We also recommend WordPress AntiVirus.
9) Install a SEO WordPress Plugin
You might have some amazing content on your site, but it would all be for naught if your posts never get a chance to be seen. Make your site SEO-friendly and optimize your posts for SEO with a plugin. We recommend WordPress SEO Plugin by Yoast.
10) Back It Up
You definitely don’t want to lose any of your website progress, so be sure to schedule some regular backups. Check out this video to learn how to manually backup your site in cPanel. If you don’t have the time to constantly backup your site, Doteasy also offers an automatic site backup service. It can be one less thing to worry about.
So that’s it, 10 essential steps to take after installing WordPress! Do you agree with our list? Let us know what you think.
Update Multiple WordPress Plugins to Avoid Security Vulnerability
A great number of WordPress plugins (including many popular plugins with over millions of downloads) have been reported with vulnerability issues due to the misuse of the add_query_arg() and remove_query_arg() functions. These plugins include:
- Jetpack
- WordPress SEO
- Google Analytics by Yoast
- All in One SEO Pack
- Gravity Forms
- UpdraftPlus
- WP e-Commerce
- WP Touch
- Download Monitor
- Related Posts for WordPress
- My Calendar
- P3 Profiler
- Give
- Broken Link Checker
- Ninja Forms
As the problematic functions are very popular (functions used by developers to modify and add query strings to URLs within WordPress websites), there is a great chance that some other problematic plugins are not listed above. We strongly recommend that all WordPress users perform a full site backup and update the plugins ASAP. To learn more details about the vulnerability issues, please visit this blog article from Sucuri, the online website scanning firm.
Update Your WooCommerce Plugin to Avoid Object Injection Vulnerability
A dangerous “Object Injection” vulnerability has been discovered in the WooCommerce plugin, which could allow an attacker to download any file on the vulnerable server. Attackers potentially downloading critical files which can result in a full site compromise.
If your WooCommerce “PayPal Identity Token” is set, you are most at risk.
Update Immediately
If you are using a version lower than 2.3.11, update the plugin as soon as possible. Remember to back up your site before updating your WordPress and Plugins. For a worry-free backup service, subscribe to Doteasy Auto Site Backup for just $1.50/month. For more info about this vulnerability, please read this article from Sucuri.
Brute Force Attack Prevention Tips
A Brute Force Attack is when a hacker tries many combinations of usernames and passwords until they succeed in guessing the right combination. Due to the fact that at any one time there may be many concurrent login attempts occurring on your site via malicious automated robots, this also has a negative impact on your website load time and performance. Therefore, we highly recommend WordPress users to install this comprehensive plugin, Lockdown WP Admin.
Lockdown WP Admin features hiding WordPress Admin (/wp-admin/) when a user isn’t logged in. If a user isn’t logged in and attempts to access WP Admin directly, the WordPress site will return a 404 error page. Users can can also rename the login URL. We’ve created this video to walk through the configuration steps for this plugin.
Video Tutorials
Hardening WordPress Security
WordPress is an open source software and sometimes hackers may use security exploits to compromise your site. Therefore, we’ve created a few video tutorials to help you strengthening your WordPress security.
BulletProof Security Plugin
The first video is about BulletProof Security plugin configuration. This plugin is extremely important for protecting your website from brute force attack!
In particular, we also demonstrated how to whitelist IP address(es) so that only the people using the registered IP address(es) can access to the admin dashboard of your WordPress website. This can greatly reduce the chances of having brute force attacks. To do so, you will need to insert some simple codes (found from WordPress Codex page). Below is the code you need:
<Files wp-login.php>

# Block access to wp-admin.

order deny,allow

deny from all

# Add IP to Whitelist

allow from 111.222.333.444

</Files>
Please note that 111.222.333.444 represents your IP address. You will need to replace this with your own IP address when you customize your BulletProof settings.
After watching the first video, you will know where to put the above code and how to whitelist IP address for accessing to your admin panel.
Sucuri Security SiteCheck Malware Scanner
The second video tutorial is about Sucuri Security plugin.
Sucuri Security SiteCheck Malware Scanner checks your WordPress site for malware, spam, blacklisting and other security issues like .htaccess redirects, hidden eval code, etc.
Captcha Plugin
The third video tutorial is about captcha plugin
This plugin significantly reduce the chances of spammers attacking your website by asking a math question when submitting a request to your website (e.g. visitors are asked “what’s the answer for 2+3” when leaving comment). The plugin can work on comment section as well as the login page.
WordPress Multisite Explained
WordPress features a powerful function called “Multisite”. Enabling multisite allows users to manage multiple WordPress websites from one WordPress installation. Each website in a network is independent, but the WordPress admin can modify the settings so that plugins and themes can be shared among the websites. When there are updates available for the shared theme and plugin, the site admin only needs to update the corresponding elements once instead of managing them individually. By disabling the network function, the site admin can isolate the plugins and themes access across all websites. To learn more the features and installation of WordPress Multisite, watch this video for full details.
Creating a WordPress Web Page with Page Builder Plugin
WordPress is one of the most popular CMS platforms in today’s web design industry, largely because of the vast selection of available themes, free and commercial. But most often a theme is only a starting point – there is no such thing as a perfect theme – many website owners start with a great theme and tweak it to perfectly suit their needs.
Tweaking a WordPress theme often requires coding experience. But, with Page Builder plugin, you can create responsive column layouts using WordPress widgets. This plugin features the “drag-and-drop” interface so that it helps you precisely place the content wherever you want on your website. With Page Builder, you can simply customize your own WordPress theme.
To download the Page Builder Plugin, please visit our Featured Plugin page.
We’ve created a short video to demonstrate how quick and easy it is to create a WordPress web page using Page Builder. Enjoy
How to Make a Business Website with WordPress: Step by Step
With WordPress, you can build a professional website in approximately 1 hour without any coding background! In this video, we will showcase how to build a business website with NO steps skipped.
This is our final product:
http://doteasydemo.com/business/
You can download the WordPress theme from this link:
https://wordpress.doteasy.com/free-wordpress-theme-prospect/
*NOTE: need to sign-up free account to download theme
You can download the plugin from this link:
• Shortcodes Ultimate
How to Make a Photography Website with WordPress: Step by Step
With WordPress, you can build a professional website in approximately 1 hour without any coding background! In this video, we will showcase how to build a photography website with NO steps skipped.
This is our final product:
http://doteasydemo.com/photography/
You can download the WordPress theme from this link:
http://www.dessign.net/photo-theme-responsive/
This theme has a responsive design, meaning it will auto-adjust to work on the desktop, laptop, tablet and mobile browsers.
You can download the plugins from these two links:
How to Install Plugins
In this video, we’ll demonstrate how to install WordPress plugins.
This is the demo WordPress website we built earlier!
How to Upload WordPress theme and Customization
In this video, we’ll demonstrate how to upload a WordPress theme from your computer & customize it.
This is the demo WordPress website we built earlier!
How to Install WordPress Theme
In this video, we’ll demonstrate how to find a WordPress theme in the dashboard & install it.
This is the demo WordPress website we built earlier!
How to Change Username in WordPress
Many users created their usernames as “admin” when they first installed WordPress. But for security purposes, you should avoid using “admin” as your username. However, by default, WordPress does not allow users to manually change the usernames after the setup of the account. So, if you have already used “admin” as your username, watch this video to see the alternative way to change the username in WordPress.
How to Make a Website with WordPress: Step by Step
With WordPress, you can build a professional website in approximately 1 hour without any coding background! In this video, we will showcase how to build a website with NO steps skipped.
This is our final product:
http://businessdemo.doteasydemo.com/
You can download the WordPress theme from this link:
https://wordpress.doteasy.com/free-wordpress-theme-adventurous/
In particular, we showcase how to create a Booking Page with the Booking Calendar Plugin. With this plugin, you can create a page that offers booking service for your visitor. This feature will become extremely handy for hotel, plumbers, and other service-oriented business websites that require advanced appointment bookings. You can download the plugin from this link:
Booking Calendar – https://wordpress.doteasy.com/free-wordpress-plugin-booking-calendar/
We’ve also created a Contact Us page using this plugin:
https://wordpress.doteasy.com/free-wordpress-plugin-contact-us-form/
To install WordPress to your website, you’ll need a web hosting plan that supports PHP and MySQL. Please visit our web hosting plan for full details:
http://www.doteasy.com/web-hosting/
Our Unlimited Hosting plan is only at $3.98/month. Domain name included! This promotional price is only for new sign up. 1st Year Only!
Getting Started with WordPress
The following video playlist covers a wide range of WordPress topics: from “What is WordPress”, “How to Install WordPress”, to “Customizing a WordPress theme” and “WordPress Settings and Configurations”. The playlist contains total of 23 videos. Enjoy!
Brute Force Attack Prevention Tips
A Brute Force Attack is when a hacker tries many combinations of usernames and passwords until they succeed in guessing the right combination. Due to the fact that at any one time there may be many concurrent login attempts occurring on your site via malicious automated robots, this also has a negative impact on your website load time and performance. Therefore, we highly recommend WordPress users to install this comprehensive plugin, Lockdown WP Admin.
Lockdown WP Admin features hiding WordPress Admin (/wp-admin/) when a user isn’t logged in. If a user isn’t logged in and attempts to access WP Admin directly, the WordPress site will return a 404 error page. Users can can also rename the login URL. We’ve created this video to walk through the configuration steps for this plugin.
How to Make a Wedding Website with WordPress: Step by Step
Creating your own personal wedding website can make your big day even more special. In this video, we’ll show you how to easily create a wedding website with WordPress, with NO steps skipped.
This is our final product:
http://doteasydemo.com/weddingdemo/
You can download the WordPress theme from this link:
https://wordpress.doteasy.com/free-wordpress-themecudazi-mono/
You can download the plugins from this link:
• RSVP
Hosting
WordPress Hosting Environment
When you ask yourself what is WordPress Hosting, you may arrive at different conclusions. The easiest way to think of this is simply the Hosting Environment in which you setup WordPress. That environment needs to have the technical capabilities needed to run WordPress along with the creative freedom needed for your site to flourish and grow. We try to make sure you have everything you need to run WordPress now and in the future.
Our Unlimited Hosting plan comes with a WordPress auto-installer that can help you easily, and quickly sew the seeds of your WordPress site within the our Hosting Environment. Unlimited Hosting is here to provide you with a protective PHP & MYSQL environment using up to date versions to shelter your ideas from the harmful insects of the internet so that your site can blossom into the beautiful creation that you envision. After you have cultivated your site to be everything you wish and more, it’s time to make it live and visible so that others can appreciate your work. Our stable servers have 99.98% up-time to make sure that when you and your visitors come to see your creation, it’s there waiting for everyone to behold.
There are times along the way where you may find yourself having questions when trying to make it work the way you wish. No need to worry as our friendly technical & support staff are here to lend a helping hand when you need it as we’d love to see your site flourish just as much as you do. Just simply contact us when you have questions about the site, please don’t hesitate to contact our support as they are waiting to assist you.
If you’re ready to get started, simply Sign-up Now!